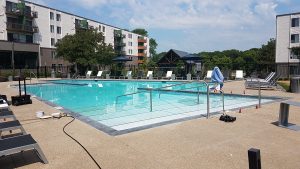
Welcome

Shopping Cart

•••••

Your cart is currently empty.

Blog

Case Study: Long Plumbing Run with Multiple Leak Noises


Type of Pool:

Concrete – Commercial Pool

Situation:

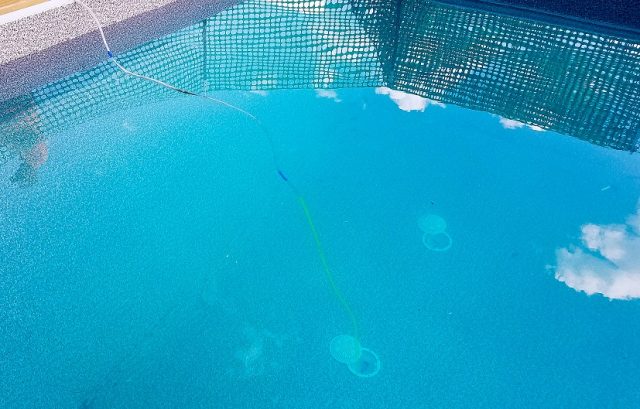
The pool cleaner noticed that suction was not as strong as it used to be, which caused difficulty when cleaning the pool. There wasn’t significant water loss, so the customer didn’t suspect a large leak.


Solution:

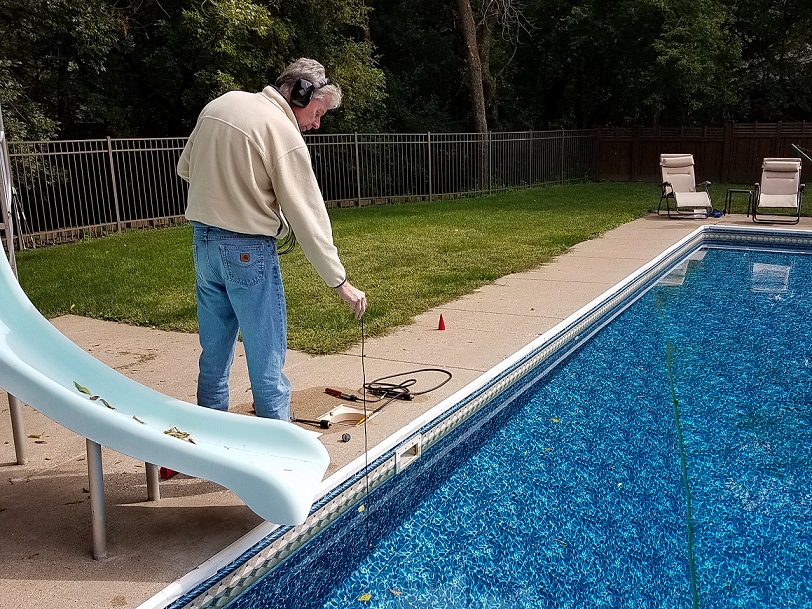
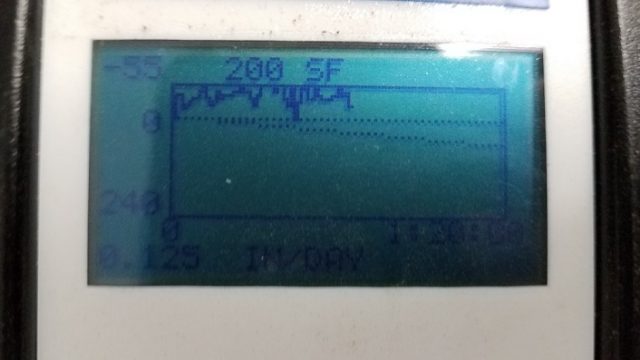
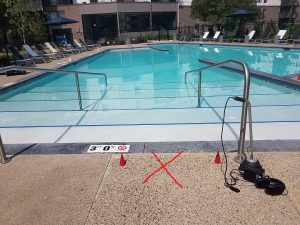
We started by shutting the pump off and running a static dye test using Dye Testing Cones. The line that included all five skimmers did not pass the static dye test, which indicated that there was a leak somewhere in that line. We then moved on to running a water pressure test on the line. The pool equipment was about 250 feet away from the pool, so it took a long time to build up pressure. Once pressure was built up, it  dropped quickly, confirming that there was a leak in the pipe.

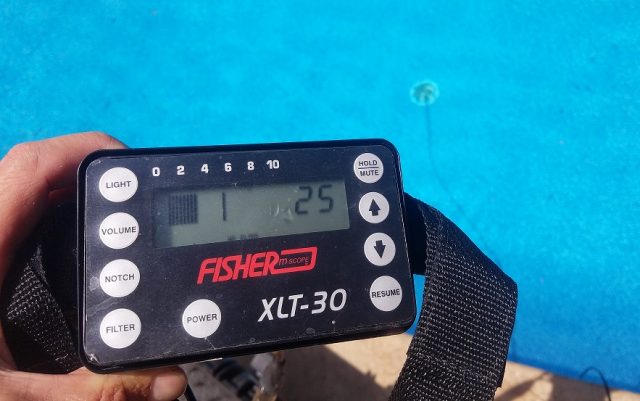
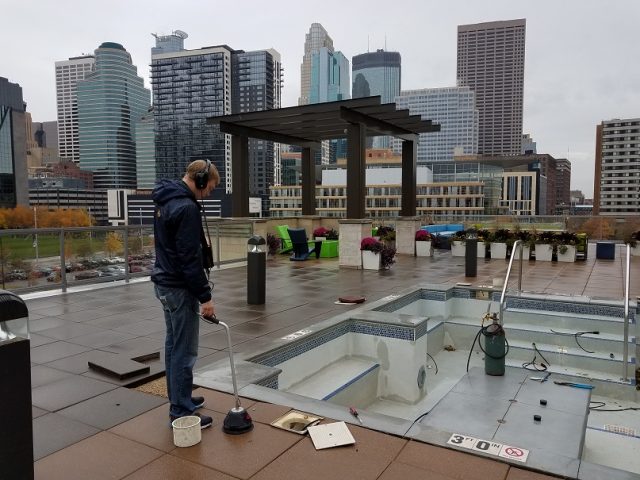
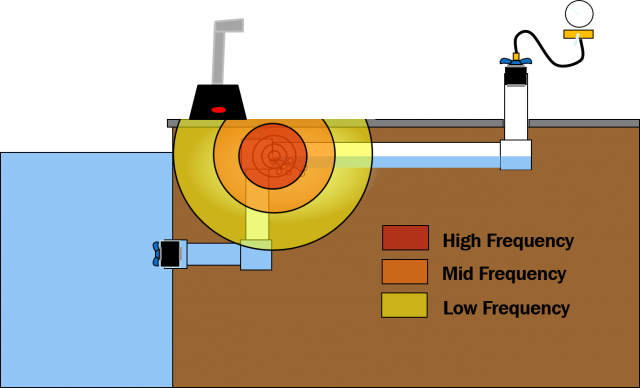
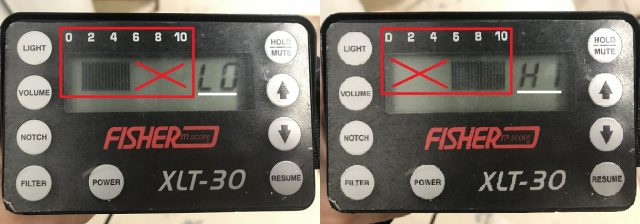
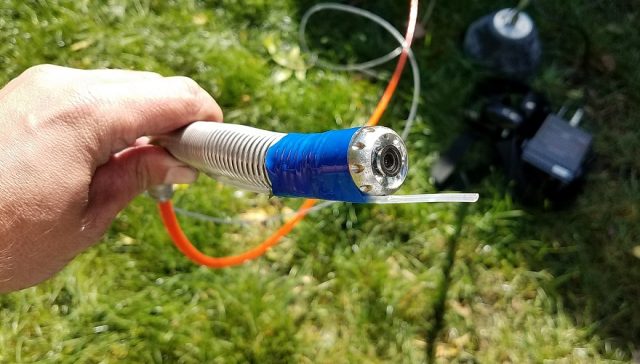
To locate the leak, we needed to get pressurized air to escape through the leak into water saturated soil. This makes the telltale bubbling sound that can be picked up by our Fisher listening device. To ensure that air reached the leak, we attempted to purge all the water from the line by inducing air. But, because the plumbing run was so long, it was hard to be certain that all the water had been purged. When we tried inducing air into the line from one of the skimmers we heard the leak noise in several areas along the plumbing run.  Noise in several spots can indicate that there are multiple leaks, but could also be caused by low spots in the plumbing where the induced air is traveling through standing water still in the pipe.  This is most likely to happen when inducing air from the low end of the plumbing.

Changing where the air pressure is being induced from can help rule out low spots and pinpoint the leak location. In this case, since we heard multiple leak noises, we changed to inducing pressure through a different skimmer on the other side of the pool. When air was induced from this skimmer, we heard a leak noise on this side of the pool but there was no longer a noise on the other side. The only place that made a leak noise from both induction points was between the two skimmers. So, that place was the most likely leak location. To verify that there wasn’t a leak farther down the line toward the equipment, we switched the induction point to a final location in the pump house. This caused a noise in a new location between the pool and the pump house as well as in the previous place between the skimmers. Since there was only one place where a leak noise was heard from all three induction points, we determined that was the leak location.

Because we were unable to get all the water out of the line there were also misleading sounds caused by air traveling through water trapped in low spots of the plumbing. By comparing leak noise locations as we changed the induction points, we could decipher which noise was the leak noise and which noises were false positives. Under pressure, air will only travel as far as it must in order to escape through the leak, so the low spots in the plumbing did not make noise unless they were between the induction spot and the leak location.

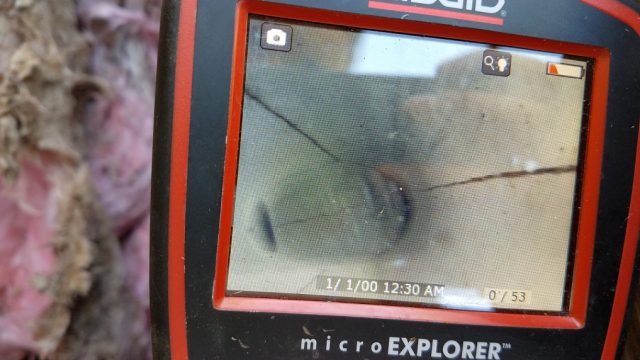
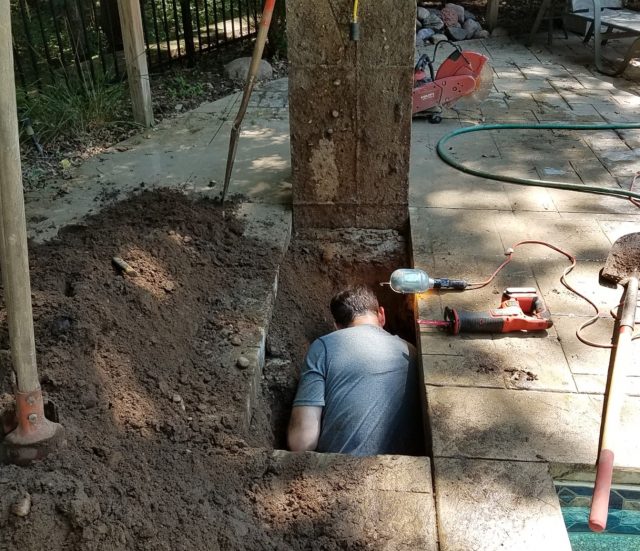
The extra listening time paid off – once the concrete was cut, we could see that our leak location was spot on! During the repair the lines were pressure tested to ensure that the other noises we had heard were not also leaks. While inducing air from multiple locations takes time, it’s still faster and more accurate than other methods that require you to fish equipment through the plumbing lines. Plus, due to the long plumbing run a camera wouldn’t have been able to reach the entire line and the amount of tracer gas needed to fill the line would have been expensive.

Highlights:

  1. Pressurized air escaping into water saturated soil makes a clear noise that can be accurately located with a listening device.
  2. Once pressure is built up, air in a pipe will only travel as far as it must to reach the leak, not further.
  3. Changing induction points can help rule out false noises from water stuck in low spots of the plumbing.

Listening For Plumbing Leaks With A Hydrophone

Even if you’ve made a good leak noise and are using your electronic listening device filters correctly to pinpoint the location of a plumbing leak using a deck microphone, you may want to use your hydrophone attachment from within the pool to get an additional angle on these plumbing leaks. If the leaking pipe is close to the pool wall, or in a main drain line under the pool, the bubbling noise of air escaping from the pressurized pipe can be heard with your hydrophone through the pool wall. Using a hydrophone is a great way to double check or verify the location you identified from pool deck or help hone in on a leak noise that spans a large area.

Leak technician using hydrophone to listen through pool wall

Because you’re often able to get so close to the leak when listening through the pool wall, the digital readout on your Fisher electronic listening device is especially helpful for this use. There will typically be a more definite high point in the volume readout, which can be more accurate than just relying on your ears to determine the loudest place.

Based on our experience, this method of using a hydrophone for pipe leaks has proven to be much more effective than listening for problems from inside the line.  Trying to get the hydrophone into pipes past T’s and elbows is time consuming (if not impossible), and unpressurized leaks may not even make a perceptible noise.  Knowing how to use the right tool at the right time is an important way to make your leak detection jobs efficient and accurate.


Case Study: Misleading Dye Test

Type of Pool:

Vinyl Liner

Equipment Used:

Dye Tester Cones, Pressure Testing Equipment, Electronic Listening DeviceLeakalyzer

Pool with leak detection equipment

Situation:

Customer reported that pool was losing water and suspected the skimmer line.

Solution:

Based on the customer’s suspicion we started out leak job by running  a dye test of the skimmer lines right away using the dye testing cones. The deep end skimmer was plugged while the shallow end skimmer was tested and vice versa. Both skimmers pulled dye.  Since each skimmer had its own run from the pump, and since we had isolated each line by closing valves we thought that both lines had a leak.

In order to start pinpointing those leaks, we first pressurized the line with air from the deep end skimmer back to a closed valve at the equipment. We could immediately hear the bubbling noise of air escaping into water saturated soil right below the skimmer bowl.

Then, we checked the shallow end skimmer line by switching to inducing pressure from that skimmer bowl. There was no noise and a much slower pressure drop. After listening for a while but still not finding a noise and not seeing a significant pressure drop, we switched to inducing pressure from the valves to isolate each line individually. Using this approach the shallow end skimmer line held pressure and the deep end line made noise in the same spot we had heard before.

Pressure testing from pool equipment

It turns out that the shallow end skimmer line was not leaking, but it had drawn dye through the pipes to the other skimmer break due  valves that didn’t seal off properly. Pressure testing helped us determine that there was just the one leak, not two.

We also ran a Leakalyzer test on the shell of the pool while the lines were plugged.  The results confirmed that the pool shell wasn’t losing water. We left the job having given the customer a clear leak location and the assurance that their pool would no longer be leaking once the plumbing repair was made.

Highlights:

  • Leaks can siphon through bad valves, which produces unclear results when dye testing. It’s important to understand how your tests may give deceptive information and perform secondary tests if you are left with any uncertainty. Pressure testing was able to verify the line was good despite drawing dye.
  • Opening the pump lid would have been an effective method of isolating the skimmers by creating an air break. Since the dye test was done early in our Initial Assessment we hadn’t yet opened the pump.

Case Study: New Pool, Big Leak

Type of Pool:

Vinyl Liner

Equipment Used:

Leakalyzer, LeakTrac, Dye Tester Cones, Pressure Testing Equipment, Electronic Listening Device, Hydrophone, Tube Level

Situation:

We were called to examine a new build that was losing 4” of water per day. It hadn’t been leaking for the first four days that it was filled but recently started rapidly losing water. When we arrived to the pool the water level was down below the skimmers, but the skimmer bowls were still full of water – indicating that those lines were not leaking.

Solution:

Suspecting that the problem was in a plumbing line, we did a quick dye test of the returns and cleaner line with the dye testing cones, but they also were not drawing water. Our Leakalyzer test had been running during these initial observations, and indicated a loss of 3.5 inches per day. A quick scan with the LeakTrac showed no leaks in the liner, so it was time to dive down to the main drain. A dye test with the dye testing cones showed that line was the source of our water loss.

We then plugged the main drain lines while we were diving and ran a pressure test from the equipment back to the pool. The water pressure test confirmed the line was leaking, so we then started inducing air for sonic location. It took a while for the air to reach the leak, indicating that the leak wasn’t close to the equipment where the air was being induced. So, we used a hydrophone attached to our XLT30H listening device to start listening along the main drain lines where they ran close to the shell of the pool. We could hear the loud bubbling/gurgling noise of air escaping into water saturated soil near the base of the wall in the middle of the deep end.

Since the main drains were plugged we ran another Leakalyzer test to verify that the rest of the pool shell was not losing water and the main drain line was the only issue.

A main drain leak at the base of the wall is not a repair anyone wants to make, so to verify the sonic leak location we used a tube level. We attached a clear plastic tube to the end of a standard open plug in the main drain. Now, instead the leak draining water from the pool it drained the water in the tube. The tube leaked down to the level of the leak and then stopped. We colored the water in the tube with Leakmaster Fluorescent Dye to be able to clearly see the water level. The water level stopped right at the level that we had identified with the hydrophone.

The crew dug up the leaking plumbing line and found a stake had been driven through the pipe!?!

Highlights:

  1. A hydrophone with digital sound graph is helpful when listening for main drain plumbing leaks through the shell of the pool.
  2. The Leakalyzer helps verify the rest of pool isn’t leaking while pressure testing and pinpointing leaks in plumbing.
  3. A simple tube level can help verify the depth of the leak before digging. Be creative with the materials you have on hand!

Troubleshooting Underground Pipe Leaks


There is no question that pinpointing underground pipe leaks in swimming pool plumbing can be tricky, especially when first starting out. While many different scenarios pose many different challenges, generally issues with pinpointing leaks fall into one of two categories:

  1. Not hearing a noise
  2. Hearing a noise in a large area and having trouble narrowing it down

Below are a few solutions to these common issues.

If You Can’t Hear A Noise:

First of all, don’t overlook just turning up the volume on your listening device. This can often be the fix for deeper leaks. However, more often than not adjusting your technique to make the correct leak noise is the solution to the problem. Remember, the noise you’re trying to achieve is a distinct bubbling gurgling noise that comes from air escaping through the leak into water saturated soil. For a refresh of the basics of this technique check out our “Pipe Leak Location” slideshow in the Resource Center. Below are the two most common problems that keep you from making a good leak noise.

1. Air is not reaching the leak

Air needs to be escaping from the leak into water saturated soil in order to make the noise that you’re listening for. Even if you’re inducing air into the plumbing, it may not be actually be reaching the leak due to leftover water in the pipe. Remember, water stays low in the plumbing and air stays high. If the leak is on the bottom of the pipe or in a lower section of the plumbing, it can take a long time for the induced air to push all the water out of the leak.  Air can only reach the leak if all of the water above leak level has been purged from the line. Only once you’re sure that air is escaping from the leak is it time to start listening. There are two ways to be more confident that air is reaching the leak:

  • One way to be sure air is reaching the leak is to remove the lowest plug from the line and completely purge all the water out of the line with air before reinstalling the plug and building air pressure. Since the location of the leak and how the plumbing runs is unknown at this point, this can be a time-saving solution.
  • Another way to make sure air has reached the leak is to slowly push the remaining water out through the leak by inducing air into the line. Once enough water has been pushed out and air starts escaping from the leak you’ll see a dramatic drop in pressure on your pressure gauge. This happens because air escapes from a leak faster than water does, so when the air reaches the leak that cushion of air escapes rapidly . . producing the telltale pressure drop. Once this happens it’s time to start listening. On top of not having to remove and then replace plugs, another benefit to this approach is that you further saturate the soil outside of the leak, producing a better environment for a better noise. For safety, always watch the pressure gauge so that too much pressure doesn’t build up.

2. The soil is not saturated with water

Once you know that air has reached the leak, if you still can’t hear a noise you may be dealing with a situation where the soil is not saturated enough with water. If this is the case there are a few options:

  • The first option would be to saturate or re-saturate the soil by inducing more water into the pipe and letting it escape out through the leak. Once the soil is saturated, switch back to inducing air and listen with your listening device.
  • If you are in a situation where there has been washout or the pipe is in gravel-y soil it can be difficult to maintain saturation outside of the pipe.  In this case, the technique of inducing water from the lower end of the plumbing and air from the high end with the goal of making them meet at the leak can make a great noise. You will need two means of inducing pressure, but this is a technique that can be quite effective.  This is often used on big breaks in lines where you can’t even build up pressure. If it is a smaller leak; take extra care to not build up too much pressure, this would be an indication that water is being put into the line faster than it is escaping and that air can no longer reach the leak . If you see the pressure gauge rising, reduce the rate of water flow into the line.

If You Hear A Noise Everywhere:

Many times the leak noise is so loud that it can be heard in a large area, so honing in on the precise location is a challenge. Like above, volume controls can help. Just turning the volume down can reduce the area in which you can hear the leak. Also, adjusting the amount of air being induced might give you a more distinct or crisp bubbling sound. If you’re still hearing the noise in a large area, these are some things to keep in mind as you listen:

  • The noise should be loudest AND clearest where the leak is. As you listen, don’t just look for the loudest, but also the clearest sound.  Just as sound levels soften the further you get away, sounds also begin to muffle and aren’t as clear the further you get from the leak.
  • Find and mark the outer edges of the sound area. As you move around you will eventually see a drop off in noise volume. Marking these boundaries can give you a good visual of where the center or source of the leak noise is.
  • Using the Frequency Filters on your XLT30 or XLT17 is one of the best ways to hone in on the leak sound. These filters provide significant help in reducing the search area, minimizing background noise and helping to hear a clear and distinct sound. For more detailed information on using filters check out this blog post.

Case Study: Eliminating Misleading Leak Sounds

Type of Pool:

Vinyl Liner

Equipment Used:

Leakalyzer, Pressure Testing Equipment, XLT30HHydrophoneDye

Situation:

Customer reported that the pool was leaking 1-2 inches per day and that a new liner was installed recently. When we arrived, the pool level had already dropped below the skimmers and returns.

Solution:

We ran a pump on and pump off test with the Leakalyzer and found the pool was losing slightly more water with the pump off. This indicated that we should suspect suction side plumbing. Since the pool water level was already below the skimmers we dove down to check the main drains. A dye test confirmed that the main drain line was drawing dye from both of the two main drains.

We set up our pressure testing equipment to start pinpointing the location of the leak and ran a quick pressure test with water first to confirm that what the dye was showing was accurate. Once we started inducing air and purged all the water from the line we were able to hear a good leak noise in two spots with the Hydrophone (attached to the XLT30H). The first noise was right at one of the main drain bowls and the other was in a corner of the pool. While we had the main drain lines plugged we also ran another Leakalyzer test, which verified the water loss had stopped in the pool so there was no need to run a LeakTrac on the liner or dye test the fittings, skimmers, etc.

In order to determine which noise we were hearing was actually the leak, we slid an inflatable plug 8’ into the line from the main drain bowl and re-pressure tested. The pressure test still failed, so we knew the leak had to be farther than 8’ away from the main drain bowl. With this information we decided that the place we heard noise in the corner of the pool was the leak location. Another confirming factor was that while we were inducing air, there would occasionally be a bubble that came up behind the liner to the surface of the pool. Before leaving we also ran pressure tests on skimmer and returns to verify the rest of the plumbing was good.

Learnings:

  1. Pressure testing helped us identify actual problem when the  noise was heard in multiple locations.
  2. Leakalyzer verified that pool shell was leak free, saving us time during the isolation phase.

Understanding Frequency Filters on Electronic Listening Devices

Ever have trouble honing in on an underground pipe leak?  Understanding how to use the frequency filters on an electronic listening device can greatly increase accuracy in underground pipe leak location.  Once the correct noise is being made at the leak and the volume of the listening device is set properly, adjusting the frequency filters can provide a great advantage in identifying the leak sound and pinpointing the exact location.

Inducing air into a leaking underground plumbing line will produce a sound right at the leak’s location where the air escapes into water saturated soil. This noise at the leak is a distinct gurgling noise that produces sounds in most of the audible frequency ranges. Understanding those frequencies can help identify the exact location of the pipe leak.  To illustrate this idea, think of a leak noise like a choir.  In a choir you hear the song being sung as a whole but it is made up of different parts: sopranos (high frequencies), altos, tenors and bases (low frequencies).  Manipulating the filters on an XLT17 or XLT30H can focus in on a specific frequency and which is beneficial for eliminating background noise and zeroing in on the leak.

How to identify which frequency range to choose  has to do with how sounds travel.  Low frequency sounds travel further than high frequencies. This is evident at an outdoor concert.  Approaching the concert from a long ways away, the first noise that you’ll hear is the base due to its low frequency. The other higher frequency ranges aren’t heard until getting closer to the stage – the source of the sound. When listening for a leak noise, starting on a low frequency allows us to hear noises in a broader area. Then, once a leak noise is identified in a broad area, switching to a higher filter blocks out the lower frequencies in order to get closer to the leak.

Filtering can also help limit unwanted background noise in order to hear the sound of the leak more distinctly. Often times the hum of an air conditioner, electrical noise, or even cars on a freeway can be distracting when listening for a swimming pool pipe leak.  While unfortunately there is no “air conditioner button”, by using the frequency filters to block out the frequency range that is most distracting, the leak noise we’re listening for becomes clearer.  The XLT30H even has a specific adjustable notch filter for this purpose.

In general the leak noise should be the loudest right on top of the leak. In addition to being loud the leak noise will also be the most clear or distinct right over the leak.  Sound waves will get muffled or disrupted the further they have to travel.  Like at the outdoor concert, the overall sound may be heard from farther away than the actual words being sung. Listen not just for the loudest noise but the clearest and most distinct sound.

It takes time to play around with the different filtering options in order to understand how they impact leak noise. If you’re just getting started with leak detection, take some extra time during your next sonic location to play around with the filters on your listening device. Every job is also a learning opportunity!


Case Study: Persistence Pays Off


Type of Pool:

Gunite Spa/Pool

Equipment Used:

LeakalyzerXLT30H, Hydrophone ,Dye, Ridgid Inspection Scope,  Ridgid Micro Drain Reel, Pressure Testing Equipment, Dye Testing Cones

Situation:

The customer called because their pool would leak down to the tile line and stop, so they wanted us to locate the leak and asses the tile line to determine if a full renovation was needed. When we got to the pool the water level was filled to the normal level as we requested, but the customer pointed out where it would typically leak down to which was an inch below the skimmer, but a couple inches above the jets. It seemed as though we were in for a quick tile line crack location and putty repair.

Solution:

We ran a Leakalyzer test to get a better understanding of how fast the pool was losing water and while doing so started listening with a hydrophone to the suspected tile line. A quick trip around the pool with the hydrophone didn’t uncover any suspect areas. We moved on to dye testing because sometimes small leaks don’t make enough noise for the hydrophone. After dye testing the whole tile line we were able to confirm that there were no leaks in the shell of the pool at the level where the water drained down to. It turns out this job was going to be a little more complicated than we thought!

We checked our ongoing Leakalyzer test which was showing a current rate of over 20” per day of water loss (small pool, big leak). To do a quick check of the plumbing lines we used the Dye Tester Cones and learned that the jet returns drew dye like crazy. Because the water level stopped higher than the jets we began to suspect the blower line instead of the jet return line. A pressure test confirmed the suspected line was leaking as we couldn’t even build any pressure. A Leakalyzer test with the jet returns plugged confirmed the rest of the pool was not losing water, so we knew we could be done with any further testing in the shell of the pool.

Since the equipment pad was positioned lower than the pool, in order to induce air from the high side of the plumbing we had to use one of the jet returns. When we started listening with the XLT30H there was a loud noise right above where we were inducing pressure that actually seemed to echo throughout the pool. There were two places that seemed louder and more distinct than the other areas though: the jet fitting and a place where the pipes presumably ran underneath the pool. We deduced that even though we were inducing from the high side of the plumbing, since the leak was in the blower line the air had to travel through remaining water in the jet line, creating some of and perhaps all the noise we were hearing. To confirm this suspicion, we switched and induced pressure from the other side of the plumbing. After this switch the sound in those two locations went silent. This confirmed we were hearing the sound of air traveling through remaining water in the pipe and not air escaping out of the leak into water saturated soil.

The lack of noise around the pool forced us to look closer to the equipment which would mean that the leak had to be well below where the water level stopped.  It turned out there was a Hartford Loop for the blower line, but it wasn’t high enough and thus didn’t stop water from draining back through until the water level reached the familiar point on the tile.  We suspect someone made a modification to the blower plumbing at some point for aesthetic reasons and buried the loop without understanding its purpose.

Building enough pressure for a quick sonic location was difficult and since we had easy access to the flexpipe  we used a Ridgid Micro Drain Scope and a line locator to pinpoint the exact location. About 15 feet in we saw what appeared to be a cracked pipe due to freeze damage.

To verify the crack we saw was our leak, water was induced into the blower line from the high side of the plumbing and we pulled that camera back towards the low side of the plumbing watching for the water flow to stop.  Sure enough the water was flowing into this crack.  The crack was dye tested with extension tubing from Anderson Manufacturing affixed to the end of the camera. The dye was drawn into the crack a well. The crack was about 8’ long and on both sides of the pipe – so no wonder we couldn’t build pressure!

Learnings:

  1. Just because water stops at the tile line doesn’t mean it’s the tile line that’s leaking!
  2. Inducing pressure from both ends of plumbing can be a way to verify if you’re hearing a leak noise vs air traveling through water in pipe. If noise is only audible when you induce from one end it may be standing water in the pipe not air escaping into water saturated soil.
  3. Dye Tester Extension Tubing can be taped to inspection cameras for leak verification or location.
  4. Persistence paid off, but this one was a bit misleading and ended up being time consuming. Some leaks are more tricky than others!


Case Study: Thin Ground Probes are Necessary for Deep Leaks

Type of Pool:

Vinyl / In-ground

Equipment Used:

Leakalyzer, XLT30H Bigfoot and Ground Probes, Hydrophone, Pressure Testing Kit, Dye

Situation

We received a call about a pool that had just had a new liner installed, but was still losing lots of water. The customer suspected the water loss was in the main drain line. When we arrived to the pool the Leakalyzer confirmed the reported water loss.

Solution

The main drain lines were plumbed separately up to the equipment, so we put an open plug in each of the main drains to see if they would draw dye. One line did, but the other did not. To confirm, we pressure tested the line that drew dye with water and it failed. In order to pinpoint the exact location of the leak, we then induced air into the line and began to listen with the hydrophone for a leak under the pool, but didn’t hear any significant noises. We then switched to using the Bigfoot microphone with the XLT30H to listen through the concrete around the pool and still didn’t hear anything that indicated the leak location. Only when we started using the XLT30H ground probes in the soil between the pool deck and the equipment were we able to get close enough to the leak to pick up a great noise and find the exact location of the leak.

Learnings

  1. Thin ground probe rods included with the XLT30H make it possible to get the probe deep into ground to absorb leak sound vibrations.
  2. Turning air pressure off and back on once hearing the leak location confirms the noise is the one we are making.

Case Study: Listening Devices Pinpoint Even the Deepest Leaks


Equipment Used:

XLT30, Pressure Testing Kit , Leakalyzer

Situation:

The customer noticed that a lot of sand was being blown into the pool and that there were bubbles in the air filter, so a problematic skimmer line was isolated and shut off.  However, even after closing and plugging that problematic skimmer line there were still sand and bubbles being blown back into the pool.

Sand in pol from leaking skimmer return line.

Solution:

When we arrived to the pool, the skimmer line was plugged and a Leakalyzer test with the pump off showed no water loss. That made us suspect that at least the portion of the plumbing below water level was good. We then pressure tested the other two skimmer lines to confirm the whole line was good and they held pressure. The main drain was eliminated as the source of a problem without getting in the water through our Leakalyzer test that covered the plumbing below the water line and an air lock test that included the line that was above water level. Eliminating all of these other areas left us to examine the problematic skimmer line as the only potential problem. Upon further inspection, the valve used to shut off the line wasn’t holding, which explains the continued bubbles and sand in the pool even after the line was taken out of use.

To determine the specific location of the leak within the faulty skimmer line, we induced air into water saturated soil to listen with the XLT30. At first the bubbling and gurgling sound of a leak was faint, but just by turning the volume up on the XLT30 we were able to identify a distinct noise where the leak was. It was fairly easy tonarrow the leak location down to a 6’ diameter, but in order to get down to within 2’ of the leak we needed to use the advanced filtering capabilities of the XLT30. Once the high filter was turned on, there was a clear spot with the most distinct noise. As sound waves travel they get more and more muffled, so the sound will be crispest and most distinct right over the leak. The sound did fade a little as time went on, but re-saturating the soil by inducing more water into the line revitalized the sound.

The customer estimated that the skimmer line was 18” to 2’ deep, but when we cut the concrete and dug down to that level there wasn’t any moisture or pipe. To confirm we were in the right place we turned the pressure back on and still heard the leak so kept digging and finally found the broken pipe at just over 4’ deep. Before we replaced the cracked fitting we cut the pipe and pressure tested both ways to assure the rest of the line was good.

Digging in concrete deck for plumbing leak

Learnings (are there any key takeaways or learnings from how this leak was found?):

  • Combining a Leakalyzer test with an air lock test of the main drain can confirm that line is solid without getting into the pool.
  • If you notice a once strong leak noise fading, you may just need to add more water to re-saturate the soil.
  • Trust your equipment! If you’re confident you heard a leak in a specific place, you may have to dig farther than expected to find it, but it will be there.

Visa, Discover, MasterCard, American Express, & PayPal