Welcome

Shopping Cart

•••••

Your cart is currently empty.

Tips & Tricks

Listening For Plumbing Leaks With A Hydrophone

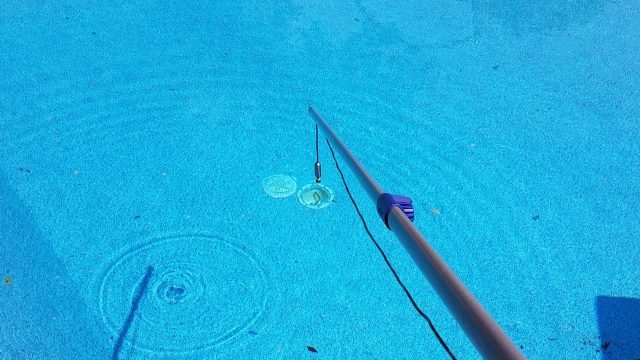
Even if you’ve made a good leak noise and are using your electronic listening device filters correctly to pinpoint the location of a plumbing leak using a deck microphone, you may want to use your hydrophone attachment from within the pool to get an additional angle on these plumbing leaks. If the leaking pipe is close to the pool wall, or in a main drain line under the pool, the bubbling noise of air escaping from the pressurized pipe can be heard with your hydrophone through the pool wall. Using a hydrophone is a great way to double check or verify the location you identified from pool deck or help hone in on a leak noise that spans a large area.

Leak technician using hydrophone to listen through pool wall

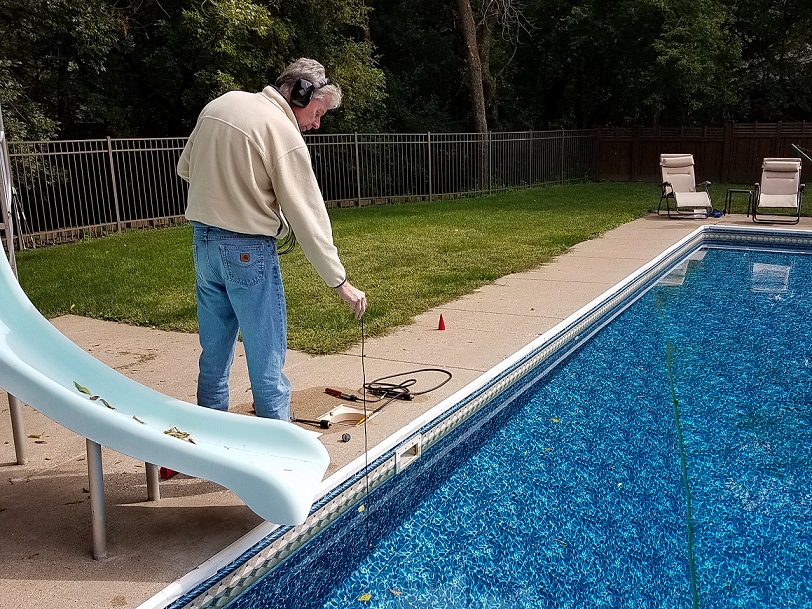
Because you’re often able to get so close to the leak when listening through the pool wall, the digital readout on your Fisher electronic listening device is especially helpful for this use. There will typically be a more definite high point in the volume readout, which can be more accurate than just relying on your ears to determine the loudest place.

Based on our experience, this method of using a hydrophone for pipe leaks has proven to be much more effective than listening for problems from inside the line.  Trying to get the hydrophone into pipes past T’s and elbows is time consuming (if not impossible), and unpressurized leaks may not even make a perceptible noise.  Knowing how to use the right tool at the right time is an important way to make your leak detection jobs efficient and accurate.


Tip: Use Leakalyzer Tests to Check for Light Leaks

As a leak detector, you’re always looking for ways to creatively isolate and test different pool elements to make your jobs more efficient. So, if you’ve already got a pool light covered to run the LeakTrac, try this tip to determine if the light is leaking using the Leakalyzer.

Once you arrive to the job and before setting up your LeakTrac, run a Leakalyzer test to establish what the baseline leak is. Then, once your LeakTrac is set up and the light cover is on, run a second test while you’re doing a scan with the LeakTrac. If the test shows less of a loss or no loss, you know to remove the light cover and investigate the light further.

Check out the below Leakalyzer reports to see how this technique worked on a recent job. Even if you don’t have a LeakTrac, the light cover can be purchased individually.


Patching Leaks in Wrinkled Vinyl

Wrinkles in vinyl liners are a common place to find leaks, but are much more challenging to repair than flat tears or holes. There are several products and techniques that can be used depending on conditions of the leak and wrinkle.

wrinkled vinyl liner

The best case option is to be able to pull the wrinkle flat before patching. Once the liner is flat it can be repaired with Boxer Glue and a vinyl patch or Leakmaster Peel & Stick Vinyl Patches. If the hole is quite large, we recommend filling it with Leakmaster Flexible Sealer before patching as an extra layer of security.

If the wrinkle can’t be pulled out, Flexible Sealer works well on its own. Once you squeeze it out onto the hole, it can be pushed down and spread with your finger to fill in the cavity of the wrinkle. Flexible Sealer will stretch and move with the liner so it lasts longer than more rigid repair materials.

If the liner has become thin or frail and it seems as though the hole or cut will continue to spread, Leakmaster Pool Glue provides an aggressive bond to vinyl and is strong enough to keep the vinyl from pulling farther apart. Pool Glue is only available in white, so it is best used with lighter liners or when aesthetics aren’t as important.

leakmaster pool glue on vinyl


Leakalyzer Tip: How to Edit Data in the Reporter Program

Did you know that you can crop data in the Leakalyzer reporter program to make your reports clearer and more accurate? While seeing how the graph responds to a variety of environmental factors is helpful most of the time, there may be situations where an otherwise good test goes awry. Say a diver gets in the pool toward the end of a test and causes the water level to rise, but you still want to be able to include the test in a report for the homeowner. To avoid confusion you can remove the affected data from the .TXT file before it uploads into the reporter program. Here’s how it’s done.

Below is a good, clear test but it wasn’t stopped before a diver got in the water at the end of the test to make a repair. You can see the sharp rise and drop toward the end of the test – this is the portion we want to cut out.

The same test in the Leakalyzer reporter program is below. Note that the detail information is inaccurate due to the surge when the diver was in the water.

To create a reporter file without the misleading data at the end you can cut those data points out of the .TXT the Leakalyzer creates to upload the tests.  Open the .TXT file, which should look similar to below:

Find the points that correspond with the data you don’t want on the test and simply delete and re-save.  The portion below is what was deleted from the test:

An additional 30 lines of data were also removed

Save the new text file and import the updated version into the Leakalyzer Reporter Program. This will produce a much more accurate report of the water loss in the pool.  This is what the report looks like after the data was cleaned.

The estimates for inches per day and gallons per day are now more accurate and the graph is more indicative of what was actually happening to the water level of the pool.


Time Saving Products and Tips for Leak Jobs


Too many leaks and not enough time? Check out this list of time-saving products and tips to help you cruise though leak jobs as efficiently as possible.


1. Avoid callbacks by confirming all leaks have been found and fixed with the Leakalyzer.

Leaks can be deceiving, and even though you may think you’ve found the only leak in the pool there could be other smaller ones still hiding. Avoid having to return to a job site multiple times by running a Leakalyzer test before leaving to confirm the water level is no longer dropping. This ten minute step can save you hours of time!


2. Use Dye Testing Cones to quickly isolate problem plumbing areas.

Dye Testing Cones are a quick way to identify the flow of water in and out of pipes before starting a full pressure test. They can also be used with the Leaklyzer to isolate the shell of the pool or different lines while running tests. While they shouldn’t be a replacement for the definitive information pressure testing can provide, they can quickly help narrow your search area.


3. Spend less time inspecting vinyl liners by pinpointing leaks in minutes with the LeakTrac 2400.

There is no better way to find tiny punctures and tears in vinyl liners than with the LeakTrac 2400. Over the last 25 years, LeakTrac users have saved thousands of hours that they otherwise would have spent diving and dye testing.


Man uses LeakTrac 2400 near skimmer
4. Make sure to get complete and accurate information from customers before even arriving at the job site.

Asking the right questions of pool owners can save a lot of time during the information gathering step of a leak detection and lead you to to the leak faster. Check out our blog post for a guide to how to have a conversation that will make your actual time on the job more efficient.


5. Choose repair materials that are versatile, convenient, and work fast.

With a cure time of only 5 minutes,  Leakmaster Quick Set Putty is a great option for when you have limited time to make a repair, but still want something durable and long-lasting. Also, check out our pre-cut, clear Vinyl Paches that come in a variety of sizes and are the thickest on the market.


6. Avoid the extra step of purchasing and filling SCUBA tanks by using a Super Snorkel Tankless Dive Unit.

The Super Snorkel tankless dive unit makes diving a breeze and eliminates the need for extra stops to refill bulky air tanks. As much as many of us wish it wasn’t, diving is always going to be ultimately unavoidable in performing consistently successful leak detections, so it’s worth it to have a nimble, easy dive setup to make it as pain-free as possible.


7. Use Anderson Manufacturing to quickly guide you to the solutions and equipment you need.

Save time by calling us to help you determine what products will work best for your specific needs instead of spending time researching on your own. We’re driven by finding the best solution for you to be effective and profitable! We are also able to ship most orders on the same day they’re placed – so you can rely on us to fulfill orders fast.


Hydrophone Tip: Attach to Pool Pole for Easy Placement

Hydrophones can be a useful too for quickly identifying if areas of a pool may be leaking without getting in the water, but they can be difficult to position in order to hear the proper noises. Some of this frustration can be avoided by attaching the hydrophone to the end of a pool pool. You can then position the microphone exactly where you want to listen instead of tossing and dragging it along the pool floor.

A pool pole also isn’t your only option. One of our customers even attached his hydrophone to a telescoping fishing pole for a more permanent solution that was easy to store and didn’t have to be removed when otherwise using the pool pole. Creativity typically pays off when it comes to leak detecting!


Leakalyzer Tip: Use Pool Cover to Eliminate Evaporation

While evaporation rate for your area can be estimated using our Evaporation Index tool, you can eliminate evaporation all together by running a Leakalyzer test with the cover closed.  This can be especially helpful in times when evaporation rates are really high in order to avoid confusing readings.  If the cover rests on the pool water in any areas it will need to be completely dry, since the water evaporating off of the top of the cover could skew results.

leakalyzer in pool with cover on


Pressure Testing Tip: How to Check for Leaks in the Main Drain Without Plugging the Line

While plugging the main drain is the most accurate way to pressure test the main drain line, if you want to avoid getting in the pool, it is possible to identify a problem in the upper part of this plumbing by using a technique called an Air Lock Test. This test takes advantage of the fact that the water above the main drain in the deep end of the pool produces a measurable amount of pressure that acts as a “plug” to an air filled main drain line.

After pressure testing the rest of the plumbing lines to ensure they are sound, induce air into the  equipment end  of the main drain line until you see it bubble out of the main drain. Then, close the valve on your pressure tester. Assuming the main drain is under about 9′ of water, the water column above it should provide 4 psi of pressure on the trapped air within the line. A pressure drop below 4 psi is an indication of a leak somewhere in the upper section of the plumbing. If the depth of the main drain you’re testing is different than 9′, the pressure the water puts on the air lock can be calculated at .43 psi per foot of water.


If there is a leak in the line in the section above the bottom of the pool, the amount of pressure loss can be used to indicate where in the line that leak is. Pressure will drop quickly until water reaches the location of the leak, at this point even though water is escaping from the leak, air will be trapped and held at a pressure representing the difference between the leak level and the water level of the pool. So, if you see that you pressure quickly drops to 2 psi, it’s likely that there’s a leak in the main drain line somewhere between 4′ – 5′ under the water level of the pool.


If there is a leak  in the section of the line at or above the water level of the pool, you’ll see a quick drop to 0 psi.

A leak in the section of plumbing under the pool shell will not be indicated from this test due to the fact that the air is still supporting the full column of water in the pool. So, if a leak is still suspected in the main drain line, it will have to be inspected by fully pressurizing the line with a plug in the main drain.


LeakTrac Tip: Sound Intensity Can Provide Clues About Leaks Outside of Vinyl Liner

While the LeakTrac is designed to specifically find leaks in vinyl liners, listening carefully to the sounds it makes can give you clues as to other issues in the pool. Since the LeakTrac locates leaks by picking up a connection to ground through the leak, it also picks up connections to ground through metal elements in the pool such as light niches or gasket screws even when they aren’t losing water. While we recommend other tools to specifically locate the leaks in these areas, a stronger signal or noise than what is expected from the LeakTrac around these areas could be a clue to your water loss problem.

Man uses LeakTrac 2400 near skimmer

As you use the LeakTrac you will become familiar with how electricity flows through the pool and what levels of intensity to expect around common ground connections such as skimmers. If you notice that the LeakTrac is giving you a stronger signal than normal at a skimmer or stair gasket, the LeakTrac could very well be reading a leak on top of the normal screw ground connection that should be investigated further. While the LeakTrac’s primary purpose will always be finding holes in vinyl liners, understanding how the science behind the equipment works and paying attention to the signals it’s giving you can increase the value you get from the tool.


Leakalyzer Tip: Portable Shade Cover

Is the hot summer sun getting in the way of your successful Leakalyzer tests? Leakalyzers perform best when their temperature remains stable throughout the duration of the test.  When exposed to the changes in radiant heat as the sun goes in and out of the clouds, the deck plate can expand and contract leading to confusing readings. We recommend setting up the Leakalyzer in a shady place whenever possible, but Mark Spatz of Florida Leak Patrol came up with a smart solution to carry shade with you wherever you go!

Mark fashioned his Leakalyzer “dog house” out of a large plastic tub that was cut to cover the deck plate and sensor capsule when set up at the pool.   The sensor rod extends up through a hole in the top.  A bucket can be placed over this rod to protect it from sunlight or the occasional unexpected stray shower.  One edge of the tub extends into the water to provide additional protection from water turbulence when the pool system is running.  Mark says he doesn’t use the cover everytime he pulls out his Leakalyzer, but that it does make his tests more accurate in certain situations.


Visa, Discover, MasterCard, American Express, & PayPal