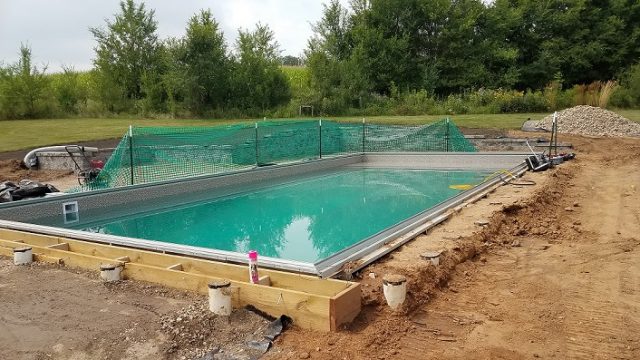
Welcome

Shopping Cart

•••••

Your cart is currently empty.

Blog

Case Study: New Pool, Big Leak

Type of Pool:

Vinyl Liner

Equipment Used:

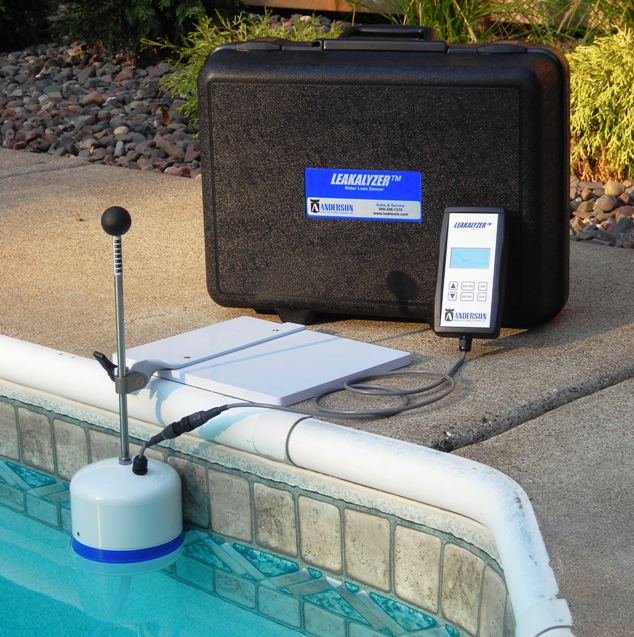
Leakalyzer, LeakTrac, Dye Tester Cones, Pressure Testing Equipment, Electronic Listening Device, Hydrophone, Tube Level
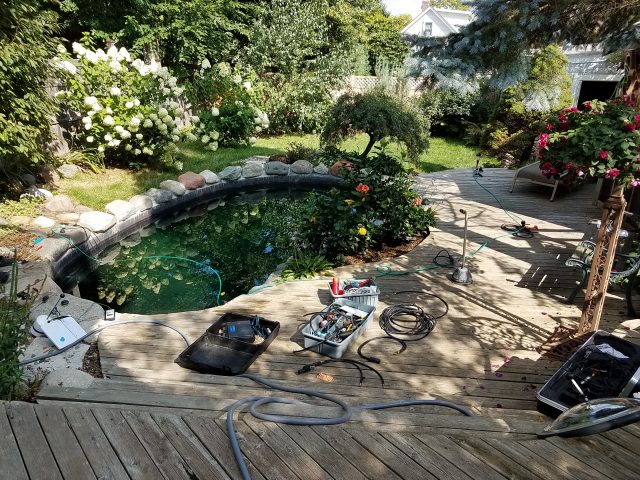
Situation:

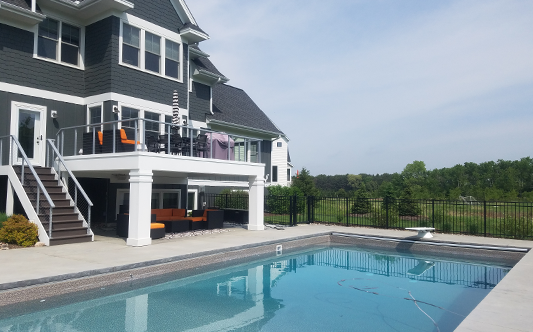
We were called to examine a new build that was losing 4” of water per day. It hadn’t been leaking for the first four days that it was filled but recently started rapidly losing water. When we arrived to the pool the water level was down below the skimmers, but the skimmer bowls were still full of water – indicating that those lines were not leaking.

Solution:

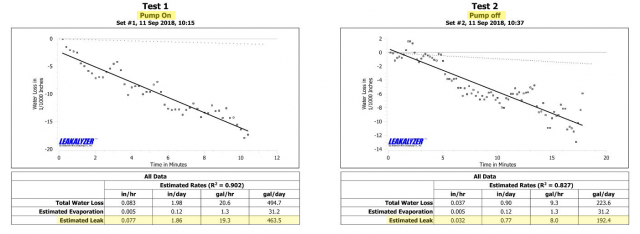
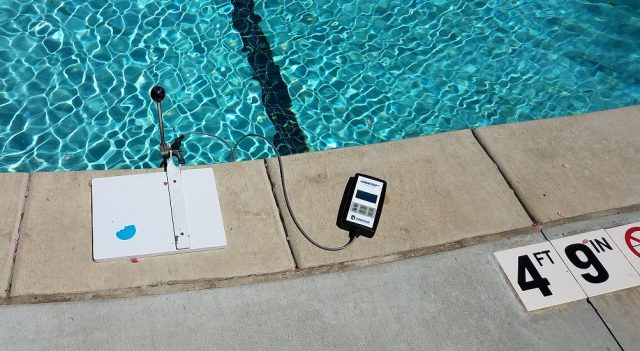
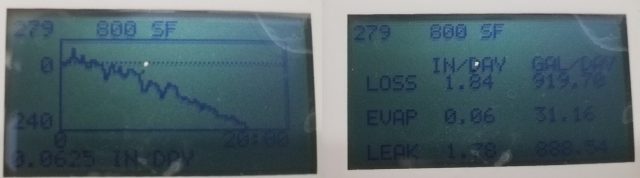
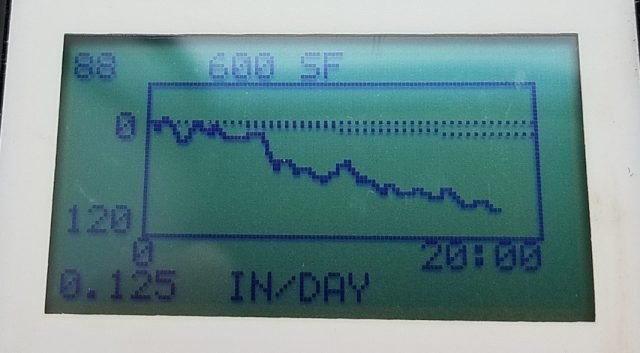
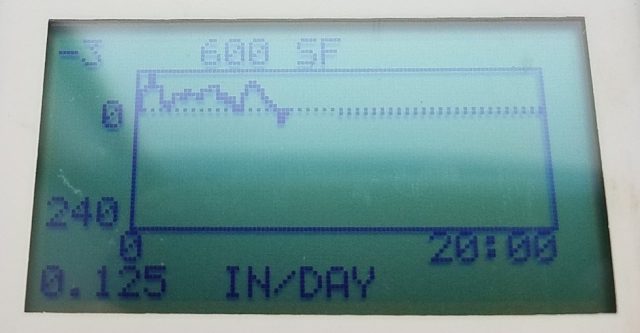
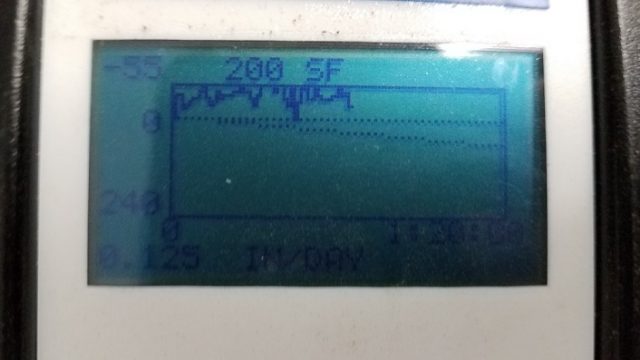
Suspecting that the problem was in a plumbing line, we did a quick dye test of the returns and cleaner line with the dye testing cones, but they also were not drawing water. Our Leakalyzer test had been running during these initial observations, and indicated a loss of 3.5 inches per day. A quick scan with the LeakTrac showed no leaks in the liner, so it was time to dive down to the main drain. A dye test with the dye testing cones showed that line was the source of our water loss.

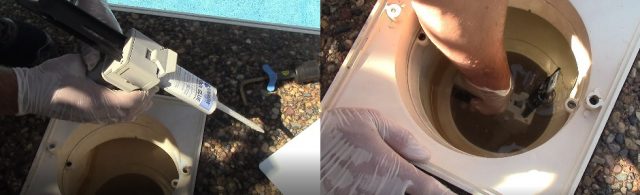
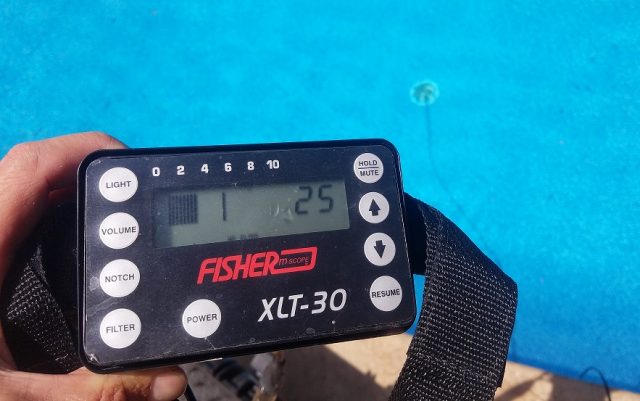
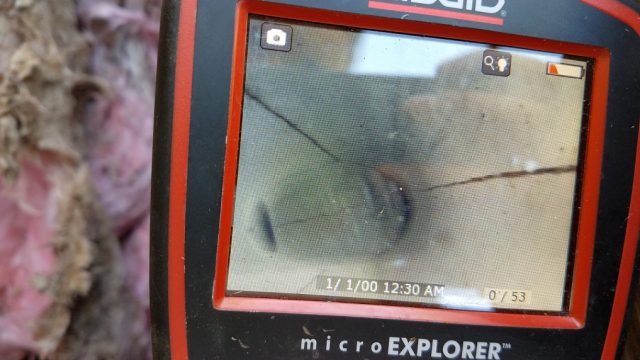
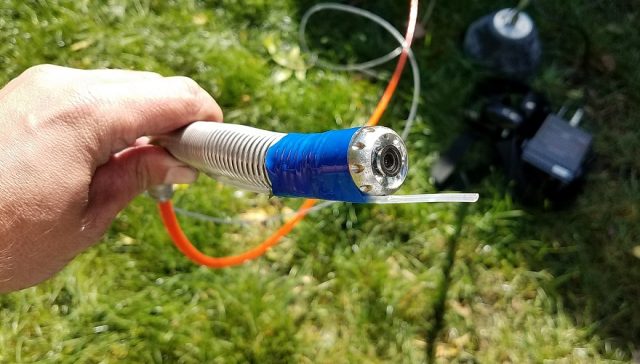
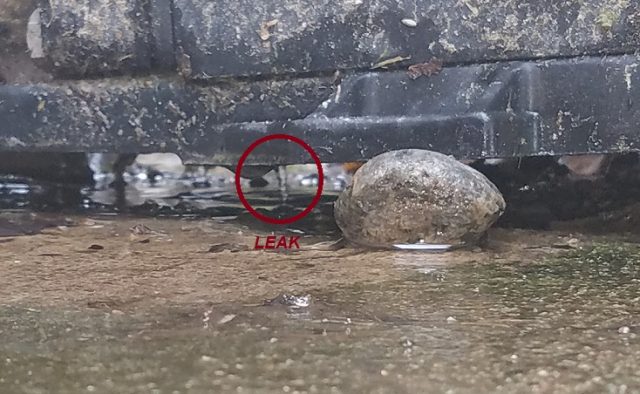
We then plugged the main drain lines while we were diving and ran a pressure test from the equipment back to the pool. The water pressure test confirmed the line was leaking, so we then started inducing air for sonic location. It took a while for the air to reach the leak, indicating that the leak wasn’t close to the equipment where the air was being induced. So, we used a hydrophone attached to our XLT30H listening device to start listening along the main drain lines where they ran close to the shell of the pool. We could hear the loud bubbling/gurgling noise of air escaping into water saturated soil near the base of the wall in the middle of the deep end.

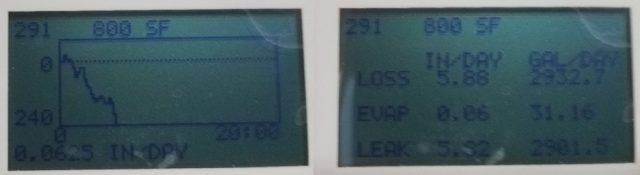
Since the main drains were plugged we ran another Leakalyzer test to verify that the rest of the pool shell was not losing water and the main drain line was the only issue.

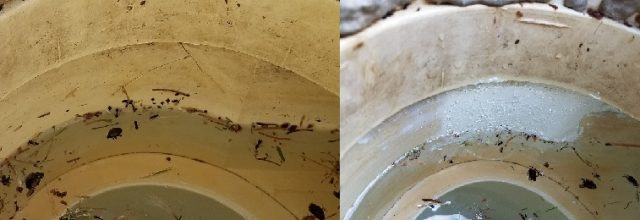
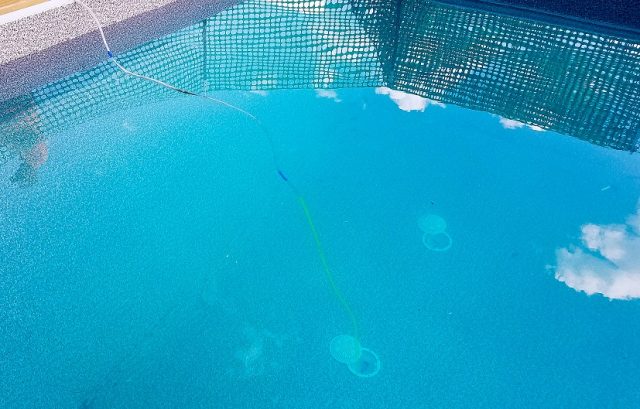
A main drain leak at the base of the wall is not a repair anyone wants to make, so to verify the sonic leak location we used a tube level. We attached a clear plastic tube to the end of a standard open plug in the main drain. Now, instead the leak draining water from the pool it drained the water in the tube. The tube leaked down to the level of the leak and then stopped. We colored the water in the tube with Leakmaster Fluorescent Dye to be able to clearly see the water level. The water level stopped right at the level that we had identified with the hydrophone.

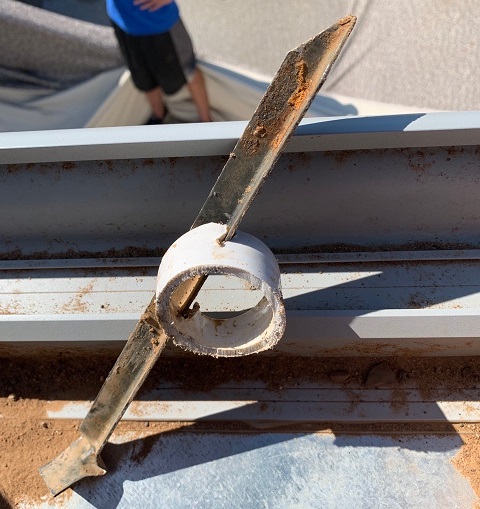
The crew dug up the leaking plumbing line and found a stake had been driven through the pipe!?!

Highlights:

  1. A hydrophone with digital sound graph is helpful when listening for main drain plumbing leaks through the shell of the pool.
  2. The Leakalyzer helps verify the rest of pool isn’t leaking while pressure testing and pinpointing leaks in plumbing.
  3. A simple tube level can help verify the depth of the leak before digging. Be creative with the materials you have on hand!

Case Study: Not What We Suspected

Type of Pool:

Vinyl Liner

Equipment Used:

Leakalyzer, LeakTrac 2400, Pressure Testing Equipment, Dye, Leakmaster Pool Glue

Situation:

We were at least the second company to take on this job, so the homeowner was concerned about how we could be sure that all the leaks were found. She was also convinced that the leak was in the return side plumbing.

Solution:

We started pump on/ pump off test with the Leakalyzer and found that the pool was losing more water with the pump running. This usually tells us to suspect pressure side plumbing.

We had two techs on this job, so one tech began running a pressure test while the other ran a vinyl scan with the LeakTrac 2400.  The pressure test on the pressure side plumbing held, but the LeakTrac was getting a stronger than normal signal coming from the skimmer.  We did a quick dye check of the skimmer and  sure enough the bottom of the skimmer bowl was cracked. The movement of water in the skimmer, or possibly even a slight shift in the suction pipe when the pump was running caused more water loss.  This was a rare situation where higher water loss with the pump running wasn’t an indication of a pressure side leak.

We repaired the skimmer bowl with Leakmaster Pool Glue and fiberglass mesh, which provides a permanent repair that will be able to handle the movement of the pool as time goes on. We charged the homeowner an additional fee for this repair. Once the repair was done, a final Leakalyzer test confirmed the now repaired skimmer leak was the only leak.

Highlights:

  1. Remember that pump on/pump off tests only provide suspicions of where the problem is.  Further tests are needed for confirmation.
  2. LeakTrac can indicate a leak in the skimmer with higher than normal intensity.
  3. Count on your own observations, diligence and reason more than what other people tell you.

Case Study: A Job Done Right Pays Off

Type of Pool:

Concrete – Commercial (Apartment Complex)

Equipment Used:

Leakalyzer, Pressure Testing Equipment, Hydrophone, Dye, Dry Suit, Super Snorkel

Situation:

After opening the pool for the summer the customer noticed significant water loss and gave us a call. When we arrived to the job the Leakalyzer reported nearly 6” of water loss per day.

Solution:

The first two leaks were found right away while we were gathering information. One was clearly visible while we were inspecting a return fitting and the other was found around an equalizer line while we were scanning the pool with a hydrophone. We were able to repair both leaks with Leakmaster Pool Repair Putty.

After the initial leaks were repaired a new Leakalyzer test reported 2.35” of water loss per day. We used dye to find two more leaks – one at another return fitting and one at the tile line.

Once these leaks were repaired the Leakalyzer was still reporting a loss of 1.84” per day. So far we had found and repaired four leaks but were still losing a significant amount of water. We ran a quick pressure test to eliminate the plumbing as the source of the remaining water loss.

Finally a crack in the tile line deeper down in the pool was found and fixed getting us to a no water loss test. Five leaks found, five leaks repaired. Between the multiple Leakalyzer tests, pressure tests, electronic microphone use, extensive dye testing and even diving in freezing spring water this job was more work than most. Once it was all said and done we felt good that we didn’t just solve one of their problems and move along. The property manager was thankful and eager to get us set up as a vendor for all their properties. They even mentioned that we’d done more than other companies had ever done.

Highlights:

  1. Large leaks in concrete pools can be found with a hydrophone, but it may not pick up smaller leaks.
  2. Using the Leakalyzer throughout the job meant we were there longer finding additional leaks, but it saved us from a costly callback.
  3. Extra effort and a job well done gets noticed and helps drive future business.

Time Saving Products and Tips for Leak Jobs


Too many leaks and not enough time? Check out this list of time-saving products and tips to help you cruise though leak jobs as efficiently as possible.


1. Avoid callbacks by confirming all leaks have been found and fixed with the Leakalyzer.

Leaks can be deceiving, and even though you may think you’ve found the only leak in the pool there could be other smaller ones still hiding. Avoid having to return to a job site multiple times by running a Leakalyzer test before leaving to confirm the water level is no longer dropping. This ten minute step can save you hours of time!


2. Use Dye Testing Cones to quickly isolate problem plumbing areas.

Dye Testing Cones are a quick way to identify the flow of water in and out of pipes before starting a full pressure test. They can also be used with the Leaklyzer to isolate the shell of the pool or different lines while running tests. While they shouldn’t be a replacement for the definitive information pressure testing can provide, they can quickly help narrow your search area.


3. Spend less time inspecting vinyl liners by pinpointing leaks in minutes with the LeakTrac 2400.

There is no better way to find tiny punctures and tears in vinyl liners than with the LeakTrac 2400. Over the last 25 years, LeakTrac users have saved thousands of hours that they otherwise would have spent diving and dye testing.


Man uses LeakTrac 2400 near skimmer
4. Make sure to get complete and accurate information from customers before even arriving at the job site.

Asking the right questions of pool owners can save a lot of time during the information gathering step of a leak detection and lead you to to the leak faster. Check out our blog post for a guide to how to have a conversation that will make your actual time on the job more efficient.


5. Choose repair materials that are versatile, convenient, and work fast.

With a cure time of only 5 minutes,  Leakmaster Quick Set Putty is a great option for when you have limited time to make a repair, but still want something durable and long-lasting. Also, check out our pre-cut, clear Vinyl Paches that come in a variety of sizes and are the thickest on the market.


6. Avoid the extra step of purchasing and filling SCUBA tanks by using a Super Snorkel Tankless Dive Unit.

The Super Snorkel tankless dive unit makes diving a breeze and eliminates the need for extra stops to refill bulky air tanks. As much as many of us wish it wasn’t, diving is always going to be ultimately unavoidable in performing consistently successful leak detections, so it’s worth it to have a nimble, easy dive setup to make it as pain-free as possible.


7. Use Anderson Manufacturing to quickly guide you to the solutions and equipment you need.

Save time by calling us to help you determine what products will work best for your specific needs instead of spending time researching on your own. We’re driven by finding the best solution for you to be effective and profitable! We are also able to ship most orders on the same day they’re placed – so you can rely on us to fulfill orders fast.


Case Study: Eliminating Misleading Leak Sounds

Type of Pool:

Vinyl Liner

Equipment Used:

Leakalyzer, Pressure Testing Equipment, XLT30HHydrophoneDye

Situation:

Customer reported that the pool was leaking 1-2 inches per day and that a new liner was installed recently. When we arrived, the pool level had already dropped below the skimmers and returns.

Solution:

We ran a pump on and pump off test with the Leakalyzer and found the pool was losing slightly more water with the pump off. This indicated that we should suspect suction side plumbing. Since the pool water level was already below the skimmers we dove down to check the main drains. A dye test confirmed that the main drain line was drawing dye from both of the two main drains.

We set up our pressure testing equipment to start pinpointing the location of the leak and ran a quick pressure test with water first to confirm that what the dye was showing was accurate. Once we started inducing air and purged all the water from the line we were able to hear a good leak noise in two spots with the Hydrophone (attached to the XLT30H). The first noise was right at one of the main drain bowls and the other was in a corner of the pool. While we had the main drain lines plugged we also ran another Leakalyzer test, which verified the water loss had stopped in the pool so there was no need to run a LeakTrac on the liner or dye test the fittings, skimmers, etc.

In order to determine which noise we were hearing was actually the leak, we slid an inflatable plug 8’ into the line from the main drain bowl and re-pressure tested. The pressure test still failed, so we knew the leak had to be farther than 8’ away from the main drain bowl. With this information we decided that the place we heard noise in the corner of the pool was the leak location. Another confirming factor was that while we were inducing air, there would occasionally be a bubble that came up behind the liner to the surface of the pool. Before leaving we also ran pressure tests on skimmer and returns to verify the rest of the plumbing was good.

Learnings:

  1. Pressure testing helped us identify actual problem when the  noise was heard in multiple locations.
  2. Leakalyzer verified that pool shell was leak free, saving us time during the isolation phase.

Case Study: Persistence Pays Off


Type of Pool:

Gunite Spa/Pool

Equipment Used:

LeakalyzerXLT30H, Hydrophone ,Dye, Ridgid Inspection Scope,  Ridgid Micro Drain Reel, Pressure Testing Equipment, Dye Testing Cones

Situation:

The customer called because their pool would leak down to the tile line and stop, so they wanted us to locate the leak and asses the tile line to determine if a full renovation was needed. When we got to the pool the water level was filled to the normal level as we requested, but the customer pointed out where it would typically leak down to which was an inch below the skimmer, but a couple inches above the jets. It seemed as though we were in for a quick tile line crack location and putty repair.

Solution:

We ran a Leakalyzer test to get a better understanding of how fast the pool was losing water and while doing so started listening with a hydrophone to the suspected tile line. A quick trip around the pool with the hydrophone didn’t uncover any suspect areas. We moved on to dye testing because sometimes small leaks don’t make enough noise for the hydrophone. After dye testing the whole tile line we were able to confirm that there were no leaks in the shell of the pool at the level where the water drained down to. It turns out this job was going to be a little more complicated than we thought!

We checked our ongoing Leakalyzer test which was showing a current rate of over 20” per day of water loss (small pool, big leak). To do a quick check of the plumbing lines we used the Dye Tester Cones and learned that the jet returns drew dye like crazy. Because the water level stopped higher than the jets we began to suspect the blower line instead of the jet return line. A pressure test confirmed the suspected line was leaking as we couldn’t even build any pressure. A Leakalyzer test with the jet returns plugged confirmed the rest of the pool was not losing water, so we knew we could be done with any further testing in the shell of the pool.

Since the equipment pad was positioned lower than the pool, in order to induce air from the high side of the plumbing we had to use one of the jet returns. When we started listening with the XLT30H there was a loud noise right above where we were inducing pressure that actually seemed to echo throughout the pool. There were two places that seemed louder and more distinct than the other areas though: the jet fitting and a place where the pipes presumably ran underneath the pool. We deduced that even though we were inducing from the high side of the plumbing, since the leak was in the blower line the air had to travel through remaining water in the jet line, creating some of and perhaps all the noise we were hearing. To confirm this suspicion, we switched and induced pressure from the other side of the plumbing. After this switch the sound in those two locations went silent. This confirmed we were hearing the sound of air traveling through remaining water in the pipe and not air escaping out of the leak into water saturated soil.

The lack of noise around the pool forced us to look closer to the equipment which would mean that the leak had to be well below where the water level stopped.  It turned out there was a Hartford Loop for the blower line, but it wasn’t high enough and thus didn’t stop water from draining back through until the water level reached the familiar point on the tile.  We suspect someone made a modification to the blower plumbing at some point for aesthetic reasons and buried the loop without understanding its purpose.

Building enough pressure for a quick sonic location was difficult and since we had easy access to the flexpipe  we used a Ridgid Micro Drain Scope and a line locator to pinpoint the exact location. About 15 feet in we saw what appeared to be a cracked pipe due to freeze damage.

To verify the crack we saw was our leak, water was induced into the blower line from the high side of the plumbing and we pulled that camera back towards the low side of the plumbing watching for the water flow to stop.  Sure enough the water was flowing into this crack.  The crack was dye tested with extension tubing from Anderson Manufacturing affixed to the end of the camera. The dye was drawn into the crack a well. The crack was about 8’ long and on both sides of the pipe – so no wonder we couldn’t build pressure!

Learnings:

  1. Just because water stops at the tile line doesn’t mean it’s the tile line that’s leaking!
  2. Inducing pressure from both ends of plumbing can be a way to verify if you’re hearing a leak noise vs air traveling through water in pipe. If noise is only audible when you induce from one end it may be standing water in the pipe not air escaping into water saturated soil.
  3. Dye Tester Extension Tubing can be taped to inspection cameras for leak verification or location.
  4. Persistence paid off, but this one was a bit misleading and ended up being time consuming. Some leaks are more tricky than others!


Case Study: More than Meets the Eye

Type of Pool:

Vinyl liner

Equipment Used:

Leakalyzer, LeakTrac 2400, Dye

Situation:

The customer called us because they noticed the equipment pad was always wet, and the water level was dropping in the pool (estimated at ½” per day). They could not identify where the water was coming from, but thought the heater may be the problem.

Solution:

On arrival we ran a Leakalyzer test that showed .6” of water loss per day.

As the customer had reported, the equipment pad was very wet but we found that the heater was dry. We then lifted up the pump, which made a leak under the pump visible.

With the pump off, we then ran another Leakalyzer test that still showed .39” per day of loss, which meant that the equipment leak was only producing .21” of loss per day, so there must be an additional leak in the pool. We started examining the shell of the pool by dye testing a few areas where there had been previous repairs, but none of them drew dye. We than ran the LeakTrac 2400 which led us to two leaks in the same corner: one where a patch was leaking again, and a new hole in the liner about 6” away from the other leak. The LeakTrac 2400 could clearly differentiate between the two holes even though they were close together.

After patching the liner leaks we ran another Leakalyzer test with the pump off that showed no water loss, meaning the only leak left was the one in the pump. Not only did the Leakalyzer help us determine that there were multiple leaks in the pool, but it also confirmed that we had found all of the problems before leaving.

Learnings:

  1. Just because you find an obvious leak doesn’t mean you’ve found all of the problems at a pool – the Leakalyzer can help avoid that mistake!
  2. The LeakTrac 2400 can find multiple leaks in a pool, even if they’re close together.

Case Study: Multiple Leaks Don’t Have To Mean Multiple Trips

Type of Pool:

Vinyl In-ground

Equipment Used:

Leakalyzer, Dye

Situation:

Customer reported that the pool was losing water and had a light leak patched a year ago. It was a smaller pool with no deep end.

Solution:

Ran a Leakalyzer test upon arrival which showed a water loss of about ½” per day. Since we knew the light was a suspect area, we checked it right away with the Light Tester dome and it drew dye. After jumping in the pool and opening up the light we were able to pinpoint the leak between the light conduit and light niche with dye. At that point, the family showed up wanting to swim since it was a hot day. Since we had already found and fixed a leak we skipped the final Leakalyzer test… of course we got a call back one week later to let us know that the pool was still losing water.

What could have been a quick job turned into a second trip. The second time at the pool we were able to find a liner leak and a skimmer bowl leak with more thorough investigation. We made sure to run our final Leakalyzer test the second time around after fixing the leaks and didn’t get any further call backs. It’s a good reminder that just because you find one leak doesn’t mean you’ve found them all!

Learnings:

  1. Must be thorough in leak detection! Short cuts can lead to more time spent in the long run.
  2. The Leakalyzer is a crucial tool in multiple leak situations.
  3. When scheduling, make sure the customer understands they can’t swim in the pool during the leak detection!

Case Study: Thin Ground Probes are Necessary for Deep Leaks

Type of Pool:

Vinyl / In-ground

Equipment Used:

Leakalyzer, XLT30H Bigfoot and Ground Probes, Hydrophone, Pressure Testing Kit, Dye

Situation

We received a call about a pool that had just had a new liner installed, but was still losing lots of water. The customer suspected the water loss was in the main drain line. When we arrived to the pool the Leakalyzer confirmed the reported water loss.

Solution

The main drain lines were plumbed separately up to the equipment, so we put an open plug in each of the main drains to see if they would draw dye. One line did, but the other did not. To confirm, we pressure tested the line that drew dye with water and it failed. In order to pinpoint the exact location of the leak, we then induced air into the line and began to listen with the hydrophone for a leak under the pool, but didn’t hear any significant noises. We then switched to using the Bigfoot microphone with the XLT30H to listen through the concrete around the pool and still didn’t hear anything that indicated the leak location. Only when we started using the XLT30H ground probes in the soil between the pool deck and the equipment were we able to get close enough to the leak to pick up a great noise and find the exact location of the leak.

Learnings

  1. Thin ground probe rods included with the XLT30H make it possible to get the probe deep into ground to absorb leak sound vibrations.
  2. Turning air pressure off and back on once hearing the leak location confirms the noise is the one we are making.

Case Study: Air Escaping From a Leak is Loud

Type of Pool:

Vinyl Liner

Equipment Used:

Leakalyzer, LeakTrac 2400, Pressure Testing Equipment, Dye

Situation:

This job started as a request for us to run a vinyl liner scan with the LeakTrac because the customer had a leak that they suspected was in the liner in a swim ledge. So, when we arrived at the pool we did a scan of the liner, which showed the suspected swim ledge wasn’t actually a problem. The LeakTrac did locate a small leak on the vinyl stairs, but this leak didn’t draw enough dye to be the source of significant water loss. We quickly patched this leak with a Leakmaster Peel and Stick Patch before moving on to do a full leak detection.

Image of Pool

Solution:

With a quick pressure test we found a skimmer line was not holding pressure. We then switched from inducing pressure with water to inducing pressure with air and heard a loud bubbling and gurgling sound  right in the skimmer bowl without even using a listening device.  The leak turned out to be a broken pipe just below the skimmer bowl.

To verify the rest of the line was good we dropped a 550 inflatable plug with an extension hose in past the leak and found the rest of the line held pressure.

A repair was scheduled for a later date, but before leaving the pool we plugged the skimmer line and ran a Leakalyzer test to confirm all leaks had been found.

Learnings:

  1. Pressure testing is a quick way to isolate a pipe leak
  2. Air escaping from leak in pipe makes a great noise for sonic location
  3. The LeakTrac not only can be used to find leaks, but also to eliminate the liner as the location of a leak if no leaks are found


Visa, Discover, MasterCard, American Express, & PayPal