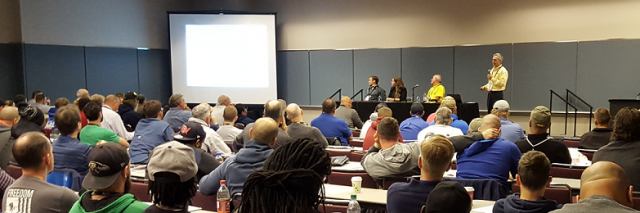
International Show: Thursday, November 1 from 9:15 AM to 10:30 AM
Northeast Pool and Spa Show: Thursday, January 29 from 8:30 AM to 11:45 AM
The basics of swimming pool leak detection will be covered at two convention venues this trade show season. Lance Anderson and Brad Madison will teach “Finding Leaks – Turn Headaches into Profits” at the 2018 International Pool, Spa, and Patio Show in Las Vegas this October. Then, in January at the 2019 Northeast Pool and Spa Show in Atlantic City, the presentation will be given again with the addition of a panel of experts who provide another layer of in-field experience to the topic.
These can’t miss courses cover the basic procedures, techniques and tools that will turn pesky leak problems into profit making opportunities. By focusing on the underlying principles of leak detection, the seminar provides an unbiased explanation of the systematic, 3-step process that should be followed on every leak job to assure efficiency. Special attention is payed to the following topics:
What time-saving pieces of information are important to gather before going to the job site
The “Pressure Testing Principles” that explain the behavior of air and water in tested plumbing lines
How to pinpoint underground plumbing leaks with sonic and helium detection methods
How to pinpoint structural leaks in concrete, fiberglass, acrylic, and vinyl
While the seminar is geared toward those who are looking to get started with leak detection, even seasoned professionals will be able to pick up a few tips. This is also a great course to send new employees to for comprehensive training!
Attendee testimonials from previous presentations:
“This seminar made my trip worthwhile. Excellent!”
“Lance Anderson presents an excellent message – well prepared, thoughtful, and precise – his passion for the subject is appreciated.”
“An informative, well-organized approach. Excellent presentation based on research and experience.”
“The whole class will make my job easier.”
“This is the best presentation I have attended at this show in years. Well organized and thought out. Great material for a difficult problem.”
“After 25+ years in pool sales and service, I still learn something at these seminars. Keep them coming.”
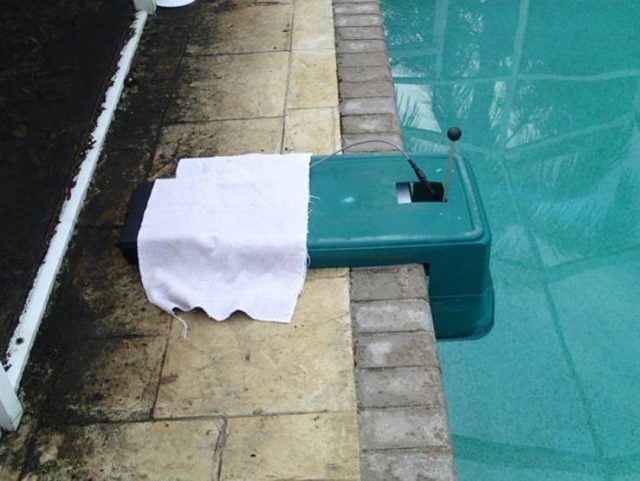
Is the hot summer sun getting in the way of your successful Leakalyzer tests? Leakalyzers perform best when their temperature remains stable throughout the duration of the test. When exposed to the changes in radiant heat as the sun goes in and out of the clouds, the deck plate can expand and contract leading to confusing readings. We recommend setting up the Leakalyzer in a shady place whenever possible, but Mark Spatz of Florida Leak Patrol came up with a smart solution to carry shade with you wherever you go!
Mark fashioned his Leakalyzer “dog house” out of a large plastic tub that was cut to cover the deck plate and sensor capsule when set up at the pool. The sensor rod extends up through a hole in the top. A bucket can be placed over this rod to protect it from sunlight or the occasional unexpected stray shower. One edge of the tub extends into the water to provide additional protection from water turbulence when the pool system is running. Mark says he doesn’t use the cover everytime he pulls out his Leakalyzer, but that it does make his tests more accurate in certain situations.
An efficient leak detection job starts well before you open the gate to your customer’s back yard. You can save a great deal of time by gathering and processing information about the suspected leak before the job is even scheduled. Make a practice of purposefully communicating with the pool owner to accomplish the following 3 objectives as the first part of your leak detection process.
1. Make sure there really is a leak
Sometimes customers are concerned about water loss that may be the result of something besides a leak. Evaporation, splash-out, or even miscommunications about when a backwash was performed can result in panicked calls to a leak professional. It’s hard to charge for a leak job if there isn’t really a problem (even after you’ve spent a lot of time looking for the non-existent leak), so it’s important to ask enough questions upfront to eliminate the possibility that the symptom they describe is anything but a leak. It’s also a good idea to schedule jobs far enough out to give the customer time to do a Bucket Test for themselves to confirm the water loss they are observing is not just due to evaporation.
Example Questions to Ask:
Why do you think you have a leak?
When did the problem start?
How much loss are you experiencing per day?
When is the last time you backwashed the pool?
2. Collect key facts that allow you to start processing the problem before you get to the pool
Leak detection is as much mental as it is physical . Your observations and tests at the pool are just one source of clues that can lead you to solving the elusive problem. By asking strategic questions of the pool owner before you get to the job, you can start thinking about and solving the problem even while you are driving. Knowing when the pool was built, who built it, how it is used, and when it started leaking can provide clues to where the leak will be, especially as you start building a mental database of previous leaks you’ve found. Other information about the nature of the problem, like whether it leaks more with the pump on or off, will also help to establish what part of the pool may be the most suspect.
Example Questions to Ask:
How far down have you let the water level go?
Does the pool have any unique features such as an attached spa, waterfall, or in-floor cleaning system?
When was the pool built and who built it?
Who typically uses the pool and how do they use it?
Have there been any unusual events associated with the pool recently?
Have you recently had repairs or construction work done in or around the pool?
3. Clearly establish what the expectations are for the condition of, and access to the pool
Generally the tests you do on site will require that the pool be filled to its normal operating level. Make sure the customer knows this. You may also have to get in the pool for inspection and repair, so it’s a good idea to request the pool be clean and warm if possible. Of course, you can’t work on a pool that you can’t get to, so make sure the customer provides information on how to access the pool in case they aren’t there. It’s easy to assume that these simple and common sense issues will be obvious, but a few wasted trips to a pool reinforce the fact that it’s better to err on the side of over-communication.
Example Questions to Ask:
Is the pool filled to its normal level?
Do I need any keys or codes to access the pool and equipment?
Is the pool clean?
Will you be home when I’m working on the pool? If not, how can I reach you during that time?
For more in depth discussion of the information gathering step and how it fits into the rest of the leak detection process check out the slide shows available in our resource center.
This job started as a request for us to run a vinyl liner scan with the LeakTrac because the customer had a leak that they suspected was in the liner in a swim ledge. So, when we arrived at the pool we did a scan of the liner, which showed the suspected swim ledge wasn’t actually a problem. The LeakTrac did locate a small leak on the vinyl stairs, but this leak didn’t draw enough dye to be the source of significant water loss. We quickly patched this leak with a Leakmaster Peel and Stick Patch before moving on to do a full leak detection.
Solution:
With a quick pressure test we found a skimmer line was not holding pressure. We then switched from inducing pressure with water to inducing pressure with air and heard a loud bubbling and gurgling sound right in the skimmer bowl without even using a listening device. The leak turned out to be a broken pipe just below the skimmer bowl.
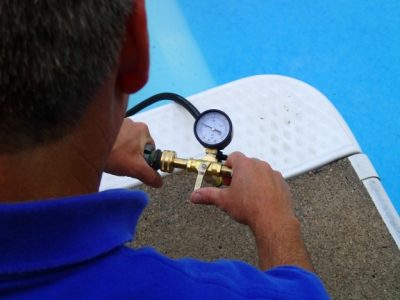
To verify the rest of the line was good we dropped a 550 inflatable plug with an extension hose in past the leak and found the rest of the line held pressure.
A repair was scheduled for a later date, but before leaving the pool we plugged the skimmer line and ran a Leakalyzer test to confirm all leaks had been found.
Learnings:
Pressure testing is a quick way to isolate a pipe leak
Air escaping from leak in pipe makes a great noise for sonic location
The LeakTrac not only can be used to find leaks, but also to eliminate the liner as the location of a leak if no leaks are found
We introduced the Light Cover for use with our LeakTrac – Vinyl Liner Leak Detector more than 20 years ago. The purpose of the cover is to insulate the light from being a distracting electrical connection from inside the pool to ground. As many of you know, skilled artisans in the leak detection business have also used the domes from these covers (and other types of covers, bowls and plugs) with dye to detect the presence of a leak in an isolated area, and they have been doing so for many years.
Red Rhino Leak Detection of West Palm Beach FL, recently acquired patents for a method and device for locating leaks in swimming pool lights using a transparent dome, dye, and a suction cup to hold the dome over the light, (#9464959, #9128002). They filed a lawsuit against us, alleging that the manufacture, sale and use of our Light Cover dome for dye testing infringes on one of their patents. We feel strongly that Red Rhino’s patents are invalid because the claimed technology has been known and used in the industry since well before Red Rhino filed its patent applications, and we also feel strongly that our LCDT product does not infringe for multiple reasons. We shared these beliefs with Red Rhino even before they sued us.
Nevertheless, we also respect the intellectual property of others. Thus, until the suit is resolved, we have elected to replace the clear dome of the LCDT product with an opaque dome. The patent at issue specifically requires that the housing (or dome) of the device be “transparent whereby the flow of dye in the hollow housing is observable by a user of the device.” With the opaque dome, the user of the LCDT product cannot observe the flow of dye in the hollow housing (dome). Thus, the modified LCDT product does not meet this requirement of the patent claim.
This modification does not change the utility of our LCDT product. To detect the presence of a leak in the area isolated by the dome of the LCDT Light Cover, we instruct the user to administer dye outside an opening in the dome. If the dye is sucked through the opening in the dome the user knows there is a leak somewhere in the isolated area that will warrant further inspection and ultimately a repair. If dye is not sucked through the opening the user can eliminate it as a possible leak source.
Thus, it does not matter whether the dome is transparent or opaque for the purposes of detecting the presence of a leak. And in fact, spending time watching the movement of dye inside the dome will provide no additional benefit because currents resulting from the draw of water into the dome actually disperses the dye faster than would be the case without the dome. In order to actually see dye move toward the leak one would have to deliver it just as carefully and closely to the suspected area as one would without the dome.
Pressure testing is a topic where a number of myths and misunderstandings have developed in the swimming pool industry. Below, we explain the truth behind 4 common misconceptions that should help you stay focused on efforts that will lead to leak detection success and profits.
MYTH #1: Pressure Testing is Unnecessary for Leak Detection
While you may be able to find common leaks without pressure testing, if you want to leave the pool assured that you have found all of the leaks . . . and you want to give the customer that assurance, pressure testing is critical.
There are other ways of finding easy to reach leaks in plumbing, but from the standpoint of conclusively determining if the entire line is leak free, nothing beats a properly performed pressure test. Furthermore, despite advancements in cameras and other probes that have applications in some situations, the most common and dependable way of pinpointing leaks underground involves the use of a listening device that picks up the sound of pressurized air escaping from a leak into water saturated soil.
MYTH #2: Air Can Be Used Interchangeably With Water for Pressure Testing
Air and water behave very differently in pressure testing situations. Understanding three pressure testing principles that address these differences is important as you determine when to use air and when to use water to build pressure.
Air compresses under pressure, water does not
Air stays at the top of the pipe, water stays at the bottom
Air escapes from leaks faster than water does
Our pressure testing slide show provides helpful diagrams and more explanation of how these principles affect your test results. As a general rule it is best to use water when testing to determine if the line is leaking since it does not compress under pressure so it will show a loss in pressure quickly, even with a small loss in volume. On the other hand, air trapped in a line can expand as water volume is lost from the leak, slowing (and sometimes completely masking) a drop in pressure. Additionally, if plugs happen to pop out under pressure they will come out with much less force if the line is pressurized with only water . . . trapped air will propel a popped plug like a cannon ball!
The main benefit of using air is that it makes a much better noise escaping from the pipe into water saturated soil than water does. So, once you have identified a leaking section of plumbing with a water test, switch to air to produce a good noise that can be picked up by your listening device.
Myth #3: Air and Water Can Be “Mixed” in a Pressure Tester and Will Stay “Mixed” Inside the Pipe
We’ve debunked this myth by testing it on a plumbing system made of clear PVC. Regardless of how they are transmitted into the pipe, water stays low and air stays high. They do not stay mixed up just because they are put under pressure. This is simple physics and anyone who says otherwise is selling you hocus-pocus.
Adding both air and water to a line is not the first step you should take when trying to make a good leak noise. While it is indeed important for the soil to be full of water outside of the pipe where air will blow out through the leak, no noise is made unless air actually gets to the leak. Since water stays at the bottom of the pipe and air at the top, if the leak is in the low end of the plumbing no air will get to it if you are adding both air and water. So, all of the water above the leak level must be purged from the line before this happens. Generally this is best accomplished by removing a low plug and blowing air from the high end. Once you see bubbles, replace the plug, set your air source regulator to maintain no higher than 5 psi, and begin listening. Larger leaks and/or leaks in soil that drains quickly may necessitate adding water while air is going into the line. To avoid noises inside the pipe, do this with a separate pressure tester from the low end of the plumbing. The best results happen when air and water do not mix inside the plumbing . . . just at the leak!
MYTH #4: Certain Kinds of Gas Make Better Noises Than Others for Leak Location
Any gas escaping from a leak will make bubbling/gurgling /hissing/spotting sounds in the full range of sonic frequencies that can be picked up with a listening device. Sometimes, leak detectors will use nitrogen tanks to deliver the gas into the line quietly (without the conflicting sound of a compressor). However, these tanks are used not because of any special characteristic of the gas (in fact, the air we breathe is made up of 78% nitrogen) but because of its ease of availability and inexpensiveness in relation to other gasses. SCUBA tanks adapted with an adjustable regulator can also be used if you can get them filled. A small compressor works just fine for inducing air pressure, especially if you use a 50 foot hose that allows you to position the compressor some distance from where you are listening.
In some situations where soil or leak conditions make it difficult to create a noise helium gas is used to find underground plumbing leaks. In these situations a Helium Detector picks up the presence of the gas as it makes its way to the soil’s surface. Helium is not being used because it makes a better noise, but because it can be detected by this detector.
If you have any questions about pressure testing or swimming pool leak detection, consult the Resource Center of our website or give us a call.
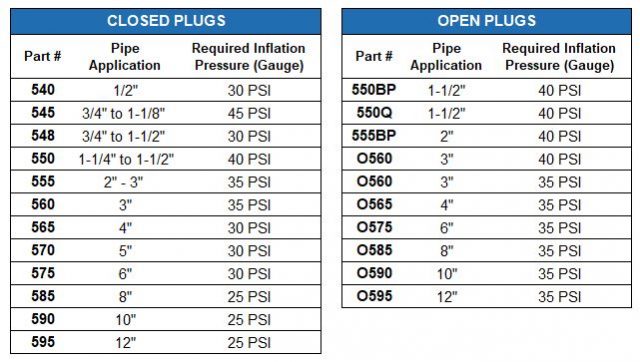
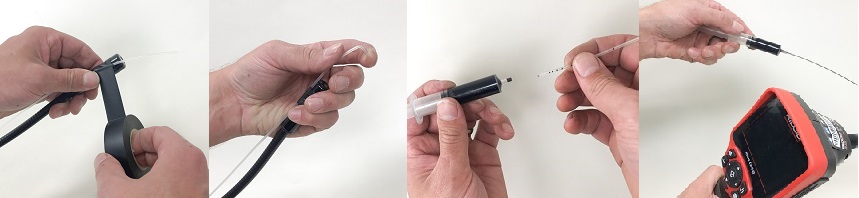
Although inflatable plugs are extremely convenient and versatile, they’re also less durable than other types of plugs. To keep them in proper working order and avoid unnecessary replacement it is important to use them correctly. Be careful to inflate the plugs only to the specified PSI (pounds per square inch) designated for each one. While it may be tempting to overfill a plug to try to fill a slightly larger line, you’ll save money in the long run by using the appropriate plug for the pipe being tested. The best way to ensure proper inflation pressure is to use a hand pump with an attached gauge. Since not all sizes have the same required inflation pressure, we’re provided a chart below for easy reference:
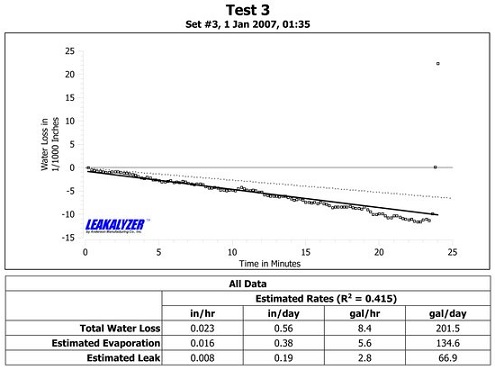
Customer told us that pool leaked down to 1” above the skimmer pretty quickly, then seemed to hold at that level.
Solution:
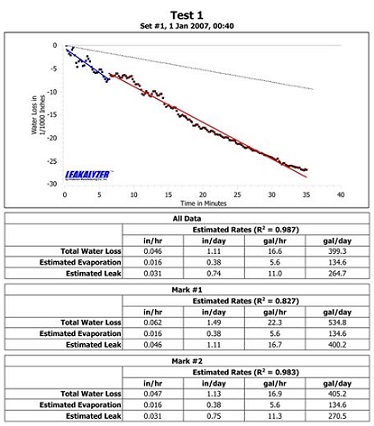
When we arrived at the job site we started our Leakalyzer test with the pump on which confirmed the water loss. After turning the pump off and marking the current test, we could see that the slope of the line continued to be the same as during the pump off test. Because of this we suspected a shell leak. Our observations of the pool equipment and plumbing system validated that the plumbing didn’t appear to be the problem.
Since a shell leak was suspected we began systematically dye testing the pool from the deck. By doing so we were able to find a crack in the skimmer bowl at the same level the customer indicated the pool water level held at. The size of the crack seemed consistent with what the customer and Leakalyzer indicated the water loss would be.
We then patched the skimmer with the Leakmaster Pool Glue Kit, which is adheres very well to the skimmer bowl and works underwater. After the patch we ran another Leakalyzer test to verify that the pool had stopped leaking. Although not as much as the first time, the test still showed water loss that was more than estimated evaporation.
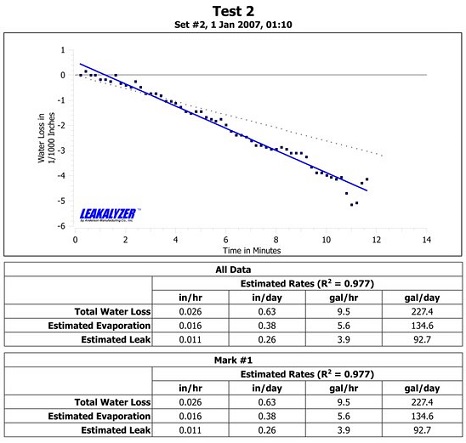
With additional dye testing we quickly found another small leak in opposite skimmer. That leak was patched with Quick Set Putty.
We ran yet another Leakalyzer test and found the pool was losing less water than before, but still losing.
The water level was a little too turbulent after patching to get a great Leakalyzer test, but we spoke with the customer one week later and pool was not losing water.
Learnings:
The Leakalyzer helped us make sure all the leaks were found before leaving the job, instead of just finding the first one
Dye testing is really fast and effective
Gathering good information from the customer shortened the leak detection process
The digitalization and resulting miniaturization of cameras over the past years has led to a proliferation of inspection cameras for all types of uses. There is great benefit to being able to “get into” and see areas that have previously been inaccessible. Pipe inspection has been a major area of application and product development for this technology.
Naturally, because of the prevalence of underground plumbing, there is great interest and intrigue in applying this technology to the swimming pool industry. Indeed, an inspection camera may prove to be an important part of your equipment arsenal for finding leaks and other related problems. As you consider an investment in the wide range of options available, it’s important to consider the unique characteristics of pool plumbing and the types of problems you’re looking for, as well as establish a clear expectation of the real benefit and usefulness they will provide to your business.
One Length Does Not Fit All
Many leak problems can be identified within the first several feet on an access point. In these situations, affordable fiber optic technology can be applied to the problem. The Rigid Inspection Scope comes with a 3 foot flexible extension that allows you to get into easy to access small openings. Range can be extended with optional 3 foot extension (providing up to 6 feet of reach). Inspection Scopes are great for looking inside return fittings, skimmer throats, and light niches without having to get into the pool. Extension tubing for dye testers can be taped to the side of the extension with the tip extending in front of the camera in order to dye test in these hard to reach spots.
If you want to go further than the first several feet into a pipe you will have to add a Camera/Push Rod system to the Inspection Scope. These robust systems have become a staple item in the plumbing, sewer, and municipal industries. Their use on swimming pool plumbing, however, offers certain challenges.
Pool Plumbing: A World of Small Pipes and Lots of Corners
The first thing to consider about pool plumbing is that relatively speaking (at least in terms of where most pipe inspection cameras are used), it is on the very smallest end of range most cameras can be used on. Pushing a camera into this small pipe, especially around elbows and T’s presents problems. Bruce Roache of CT says that in 1 1/2″ plumbing his Rigid Micro Camera is “great on straight runs and can reliably get through the first 90 degree bend, but it has been so difficult to get past a second 90 degree corner that I don’t do it anymore for fear of getting it stuck or damaging it as I pull it out.” Christine Pearson of Excaliber Leak Detection in MD uses her Rigid Nano extensively and can get it through more than one elbow. But she admits that even this device can be damaged when pushed too far. “If you are hoping a pipe camera will enable you to quickly inspect an entire plumbing system you will be disappointed. A camera won’t replace other methods of detecting and locating leaks in the plumbing. But, if you want clear evidence of problems in the areas it can reach, the images and video it provides can’t be beat.” Actually being able to see things like big leaks, obstructions in the line, and crushed pipe can help determine the cause and repairability of the problem, and communicate clearly with the customer.
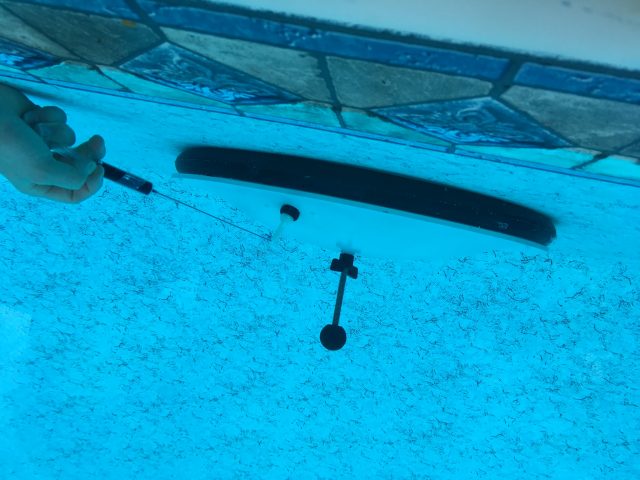
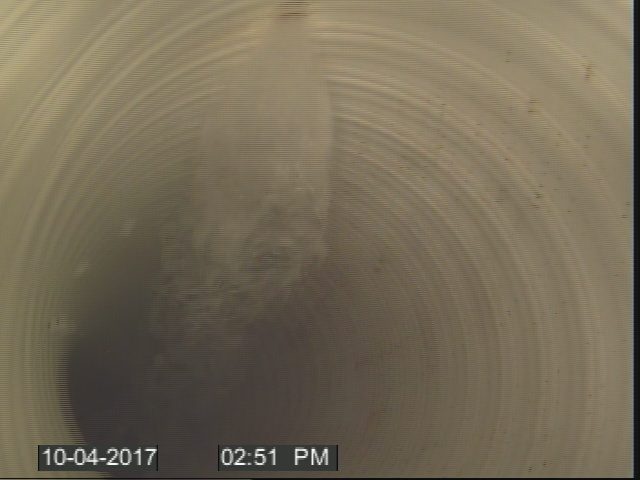
Bubbles are clearly visible from this suction side leak while the pump is running.
While small PVC pipes with elbows and T’s can pose problems, straight runs and flex-pipe are prime applications for a Camera/Push rod system. “It is awesome in flex-pipe,” says Roache. “Although I think flex-pipe is terrible, it is very common in my area. Nothing is more convincing to a customer, pool builder, or building inspector than a live video image of the leak, the problem, or the building code pass/ fail issue!”
“We use it extensively on flex-pipe,” says Christine. “It’s especially useful on skimmer lines where we can show evidence of the damage chlorine tablets in the skimmer basket produce, or even see bubbles being pulled through a leak while the pump is on.”
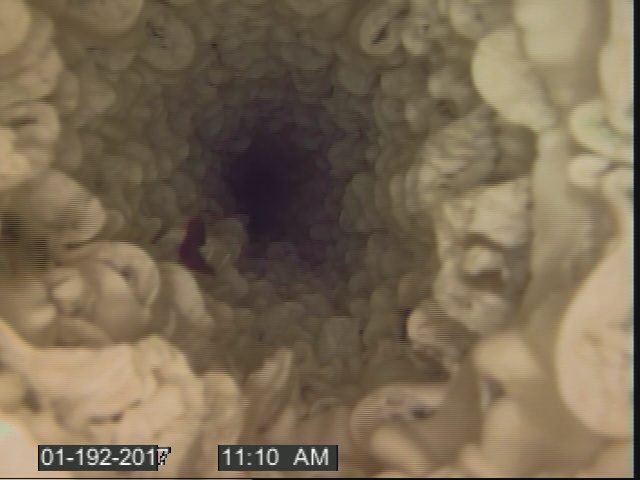
Chlorine damage on flex pipe
You Found the Leak, Now Where is the Camera?
Once a problem has been found with a camera, determining its location on the deck so a repair can be made is the next step. Depending on how far in you’ve pushed the camera, and your knowledge of where the lines run, you may be able to estimate the location. Otherwise, you’re going to need to invest in one more piece of equipment. A line locator detects a radio frequency signal emitted by a transmitter built into the camera head. The line locator will enable you to determine location, direction of run, and depth of the pipe. These devices can also detect signals in conductive pipes, tracer wires, electrical lines, or battery operated transmitters that aren’t incorporated with the cameras. For many pool leak specialists, adding a camera and line locator to their tool arsenal has been the catalyst to expanding their business into other lucrative location/inspection markets.
A Note on Purchasing Equipment
Once you have decided whether an inspection camera and scope system is a worthwhile investment, there are a lot of options out there for purchasing . A quick search on the internet will reveal a multitude of devices at all levels of sophistication, quality and country of manufacture. Because swimming pool use can be hard on cameras (pushing and pulling them through sharp 90’s) don’t compromise on quality. We distribute Ridgid products because we feel most comfortable with their experience and knowledge of the swimming pool industry. Ridgid has also proven to be responsive when repairs are needed. Please feel free to contact us if you have any questions.
No information was provided prior to arriving at the job site, but when we arrived the water level was down to bottom of the skimmers and the customer confirmed that the water leaked down to that point and then stopped. A Leakalyzer test confirmed the water level had settled and was not dropping any farther. We established some suspect areas then put a hose in to fill the pool back up while we headed to our next job. We came back later once the water level was back up to finish the leak detection.
Solution:
When we returned to the job site, we confirmed the pool was indeed leaking with the Leakalyzer, then started to dye test the suspected areas along where the water line had settled. Not all suspected areas drew dye when the water level was raised, but we did locate two leaks in the corners where grout was gone from the tile line. We repaired the leaking areas with Quick Set Putty, then confirmed that the leaking areas were no longer drawing dye and that the pool water level had stabilized with the Leakalyzer.
Learnings:
It’s extremely helpful to know if the water level stops dropping at a certain point.
Pool water level needs to be at normal operating level to efficiently locate leaks.
Some leak detections are very straight forward!
Job also led to a sale of upgrades in pool filter.
Join Our Email List
Sign up to stay up to date on new products and techniques. We send occasional emails relevant to the swimming pool leak detection industry.