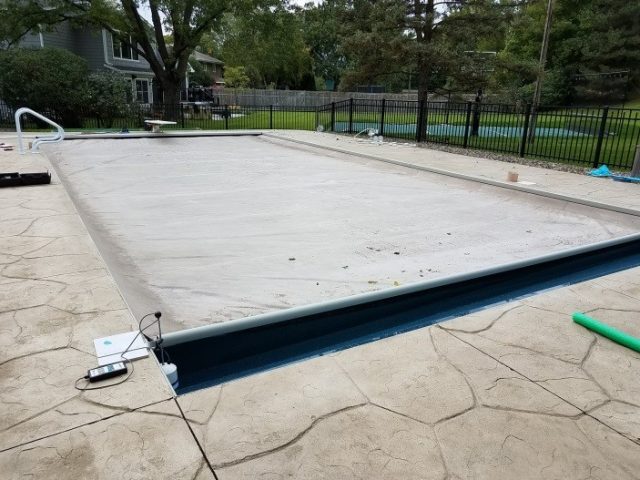
The customer called us because they noticed the equipment pad was always wet, and the water level was dropping in the pool (estimated at ½” per day). They could not identify where the water was coming from, but thought the heater may be the problem.
Solution:
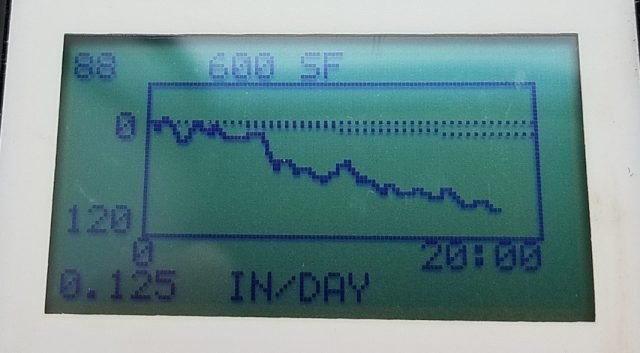
On arrival we ran a Leakalyzer test that showed .6” of water loss per day.
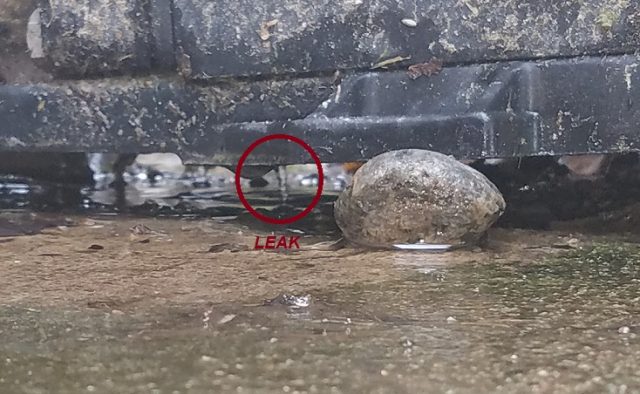
As the customer had reported, the equipment pad was very wet but we found that the heater was dry. We then lifted up the pump, which made a leak under the pump visible.
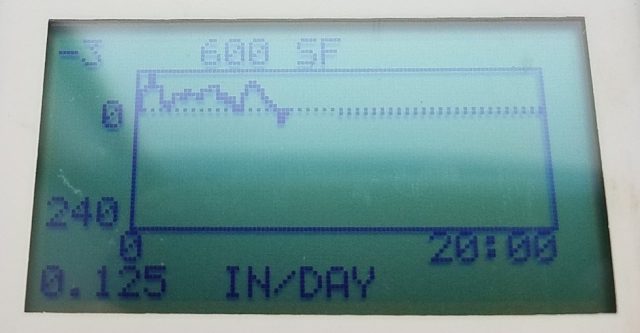
With the pump off, we then ran another Leakalyzer test that still showed .39” per day of loss, which meant that the equipment leak was only producing .21” of loss per day, so there must be an additional leak in the pool. We started examining the shell of the pool by dye testing a few areas where there had been previous repairs, but none of them drew dye. We than ran the LeakTrac 2400 which led us to two leaks in the same corner: one where a patch was leaking again, and a new hole in the liner about 6” away from the other leak. The LeakTrac 2400 could clearly differentiate between the two holes even though they were close together.
After patching the liner leaks we ran another Leakalyzer test with the pump off that showed no water loss, meaning the only leak left was the one in the pump. Not only did the Leakalyzer help us determine that there were multiple leaks in the pool, but it also confirmed that we had found all of the problems before leaving.
Learnings:
Just because you find an obvious leak doesn’t mean you’ve found all of the problems at a pool – the Leakalyzer can help avoid that mistake!
The LeakTrac 2400 can find multiple leaks in a pool, even if they’re close together.
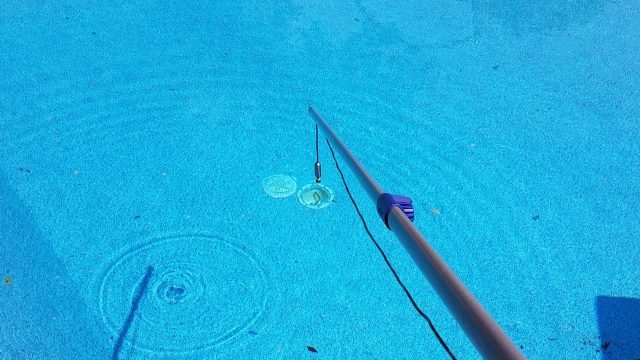
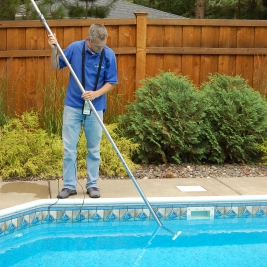
Hydrophones can be a useful too for quickly identifying if areas of a pool may be leaking without getting in the water, but they can be difficult to position in order to hear the proper noises. Some of this frustration can be avoided by attaching the hydrophone to the end of a pool pool. You can then position the microphone exactly where you want to listen instead of tossing and dragging it along the pool floor.
A pool pole also isn’t your only option. One of our customers even attached his hydrophone to a telescoping fishing pole for a more permanent solution that was easy to store and didn’t have to be removed when otherwise using the pool pole. Creativity typically pays off when it comes to leak detecting!
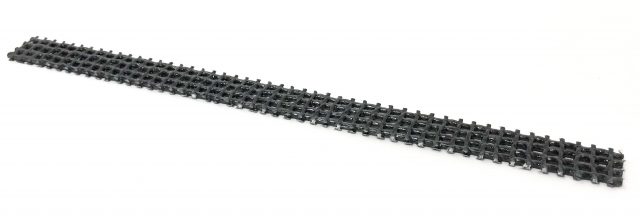
Concrete crack repair can be a daunting task – between the high cost of repair materials and the large time investment, it’s important to make sure you’re using the best products and processes to get the job done right. To help you do just that, we’re introducing the new Carbon Fiber Pool Grid Stitch, the latest innovation in concrete crack reinforcement. This new product maintains the exceptional strength of a traditional Carbon Fiber Staple, but is less expensive and features a much easier installation process.
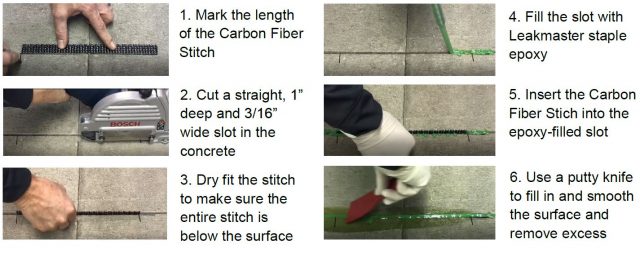
Pool Grid Stitches are designed to add value and strength to concrete crack repairs by distributing load beyond the fault. The stitches are comprised of high tensile strength carbon fiber and molded into a unique grid-like, woven formation. This grid design allows for the epoxy to move through the stitch, providing a superior bond with the staple epoxy. These time-saving stitches install perpendicularly into a single saw cut, eliminating the need for chiseling away material from the staple bed and drilling extra holes. When used with Fortress C400 epoxy Pool Grid Stitches are ICC building code certified.
Key Features:
Grid structure provides exceptional adhesion with epoxy
No drilling or chiseling, just one simple cut
Provides a strong fix for a low cost
Can be cut to a shorter length for use on curved surfaces
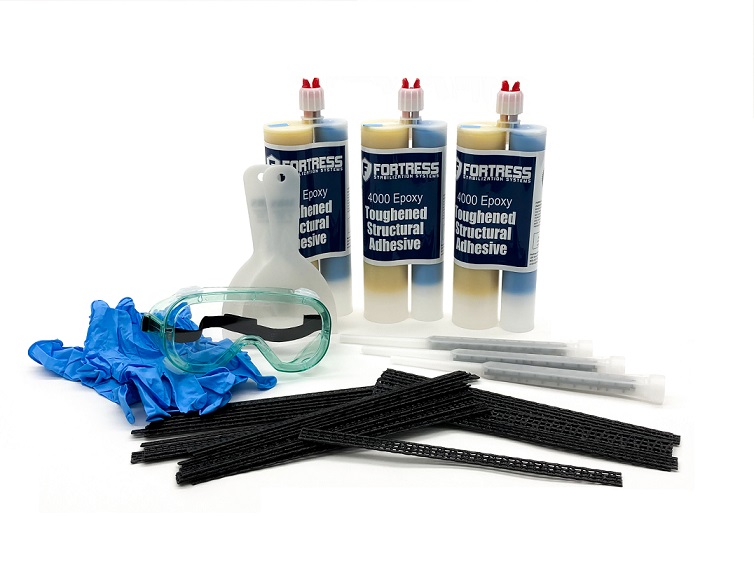
ICC building code certified when used with Fortress C400 epoxy.
The Carbon Fiber Grid Stitch is available in complete 10 or 30 stitch kits.
Customer reported that the pool was losing water and had a light leak patched a year ago. It was a smaller pool with no deep end.
Solution:
Ran a Leakalyzer test upon arrival which showed a water loss of about ½” per day. Since we knew the light was a suspect area, we checked it right away with the Light Tester dome and it drew dye. After jumping in the pool and opening up the light we were able to pinpoint the leak between the light conduit and light niche with dye. At that point, the family showed up wanting to swim since it was a hot day. Since we had already found and fixed a leak we skipped the final Leakalyzer test… of course we got a call back one week later to let us know that the pool was still losing water.
What could have been a quick job turned into a second trip. The second time at the pool we were able to find a liner leak and a skimmer bowl leak with more thorough investigation. We made sure to run our final Leakalyzer test the second time around after fixing the leaks and didn’t get any further call backs. It’s a good reminder that just because you find one leak doesn’t mean you’ve found them all!
Learnings:
Must be thorough in leak detection! Short cuts can lead to more time spent in the long run.
The Leakalyzer is a crucial tool in multiple leak situations.
When scheduling, make sure the customer understands they can’t swim in the pool during the leak detection!
While evaporation rate for your area can be estimated using our Evaporation Index tool, you can eliminate evaporation all together by running a Leakalyzer test with the cover closed. This can be especially helpful in times when evaporation rates are really high in order to avoid confusing readings. If the cover rests on the pool water in any areas it will need to be completely dry, since the water evaporating off of the top of the cover could skew results.
We received a call about a pool that had just had a new liner installed, but was still losing lots of water. The customer suspected the water loss was in the main drain line. When we arrived to the pool the Leakalyzer confirmed the reported water loss.
Solution
The main drain lines were plumbed separately up to the equipment, so we put an open plug in each of the main drains to see if they would draw dye. One line did, but the other did not. To confirm, we pressure tested the line that drew dye with water and it failed. In order to pinpoint the exact location of the leak, we then induced air into the line and began to listen with the hydrophone for a leak under the pool, but didn’t hear any significant noises. We then switched to using the Bigfoot microphone with the XLT30H to listen through the concrete around the pool and still didn’t hear anything that indicated the leak location. Only when we started using the XLT30H ground probes in the soil between the pool deck and the equipment were we able to get close enough to the leak to pick up a great noise and find the exact location of the leak.
Learnings
Thin ground probe rods included with the XLT30H make it possible to get the probe deep into ground to absorb leak sound vibrations.
Turning air pressure off and back on once hearing the leak location confirms the noise is the one we are making.
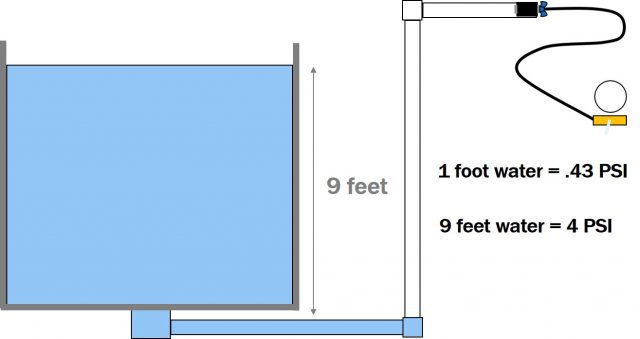
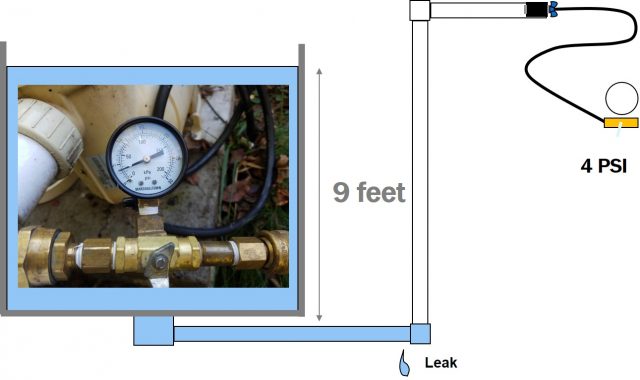
While plugging the main drain is the most accurate way to pressure test the main drain line, if you want to avoid getting in the pool, it is possible to identify a problem in the upper part of this plumbing by using a technique called an Air Lock Test. This test takes advantage of the fact that the water above the main drain in the deep end of the pool produces a measurable amount of pressure that acts as a “plug” to an air filled main drain line.
After pressure testing the rest of the plumbing lines to ensure they are sound, induce air into the equipment end of the main drain line until you see it bubble out of the main drain. Then, close the valve on your pressure tester. Assuming the main drain is under about 9′ of water, the water column above it should provide 4 psi of pressure on the trapped air within the line. A pressure drop below 4 psi is an indication of a leak somewhere in the upper section of the plumbing. If the depth of the main drain you’re testing is different than 9′, the pressure the water puts on the air lock can be calculated at .43 psi per foot of water.
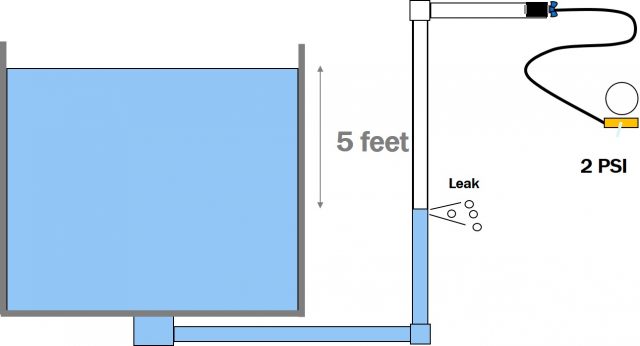
If there is a leak in the line in the section above the bottom of the pool, the amount of pressure loss can be used to indicate where in the line that leak is. Pressure will drop quickly until water reaches the location of the leak, at this point even though water is escaping from the leak, air will be trapped and held at a pressure representing the difference between the leak level and the water level of the pool. So, if you see that you pressure quickly drops to 2 psi, it’s likely that there’s a leak in the main drain line somewhere between 4′ – 5′ under the water level of the pool.
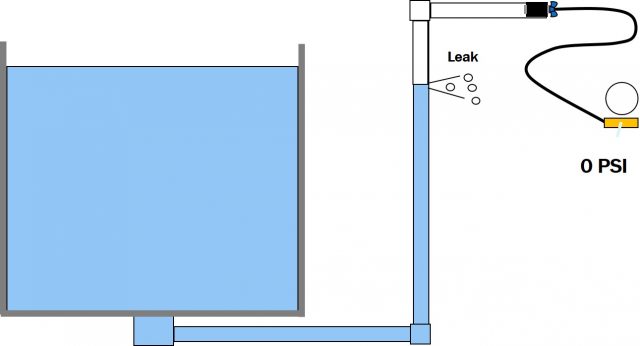
If there is a leak in the section of the line at or above the water level of the pool, you’ll see a quick drop to 0 psi.
A leak in the section of plumbing under the pool shell will not be indicated from this test due to the fact that the air is still supporting the full column of water in the pool. So, if a leak is still suspected in the main drain line, it will have to be inspected by fully pressurizing the line with a plug in the main drain.
While the LeakTrac is designed to specifically find leaks in vinyl liners, listening carefully to the sounds it makes can give you clues as to other issues in the pool. Since the LeakTrac locates leaks by picking up a connection to ground through the leak, it also picks up connections to ground through metal elements in the pool such as light niches or gasket screws even when they aren’t losing water. While we recommend other tools to specifically locate the leaks in these areas, a stronger signal or noise than what is expected from the LeakTrac around these areas could be a clue to your water loss problem.
As you use the LeakTrac you will become familiar with how electricity flows through the pool and what levels of intensity to expect around common ground connections such as skimmers. If you notice that the LeakTrac is giving you a stronger signal than normal at a skimmer or stair gasket, the LeakTrac could very well be reading a leak on top of the normal screw ground connection that should be investigated further. While the LeakTrac’s primary purpose will always be finding holes in vinyl liners, understanding how the science behind the equipment works and paying attention to the signals it’s giving you can increase the value you get from the tool.
The customer noticed that a lot of sand was being blown into the pool and that there were bubbles in the air filter, so a problematic skimmer line was isolated and shut off. However, even after closing and plugging that problematic skimmer line there were still sand and bubbles being blown back into the pool.
Solution:
When we arrived to the pool, the skimmer line was plugged and a Leakalyzer test with the pump off showed no water loss. That made us suspect that at least the portion of the plumbing below water level was good. We then pressure tested the other two skimmer lines to confirm the whole line was good and they held pressure. The main drain was eliminated as the source of a problem without getting in the water through our Leakalyzer test that covered the plumbing below the water line and an air lock test that included the line that was above water level. Eliminating all of these other areas left us to examine the problematic skimmer line as the only potential problem. Upon further inspection, the valve used to shut off the line wasn’t holding, which explains the continued bubbles and sand in the pool even after the line was taken out of use.
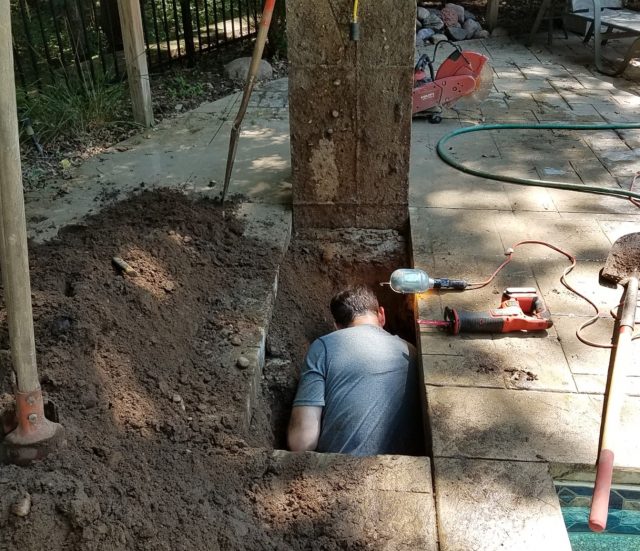
To determine the specific location of the leak within the faulty skimmer line, we induced air into water saturated soil to listen with the XLT30. At first the bubbling and gurgling sound of a leak was faint, but just by turning the volume up on the XLT30 we were able to identify a distinct noise where the leak was. It was fairly easy tonarrow the leak location down to a 6’ diameter, but in order to get down to within 2’ of the leak we needed to use the advanced filtering capabilities of the XLT30. Once the high filter was turned on, there was a clear spot with the most distinct noise. As sound waves travel they get more and more muffled, so the sound will be crispest and most distinct right over the leak. The sound did fade a little as time went on, but re-saturating the soil by inducing more water into the line revitalized the sound.
The customer estimated that the skimmer line was 18” to 2’ deep, but when we cut the concrete and dug down to that level there wasn’t any moisture or pipe. To confirm we were in the right place we turned the pressure back on and still heard the leak so kept digging and finally found the broken pipe at just over 4’ deep. Before we replaced the cracked fitting we cut the pipe and pressure tested both ways to assure the rest of the line was good.
Learnings(are there any key takeaways or learnings from how this leak was found?):
Combining a Leakalyzer test with an air lock test of the main drain can confirm that line is solid without getting into the pool.
If you notice a once strong leak noise fading, you may just need to add more water to re-saturate the soil.
Trust your equipment! If you’re confident you heard a leak in a specific place, you may have to dig farther than expected to find it, but it will be there.
What happens underground in the winterizing process? By setting up a clear PVC pipe system we can visualize the process and some of the challenges to winterizing pipes. This demonstration shows us that effectively utilizing the proper equipment and technique for blowing out plumbing lines is crucial for consistent, successful winterization. It is important to understand the three main phases of the process:
Water purge phase
Line clear phase
Sealing/securing phase
In the water purge phase, the water that fills the lines is “pushed” out of the pipe and replaced with air. Several factors are important to accomplish this part of the process effectively. First of all, the air source you use must provide enough air pressure to counter the back pressure of the water in the pool. When blowing out return lines this is a pretty low threshold, however when purging water from the main drain line a minimum of 4 psi of pressure must be achieved to push against the 8 feet of water in many deep ends. The second important factor during the purge phase is the amount of water flow that can be pushed through your blow-out plugs. The wider these plugs open under the appropriate pressure the more water you will be able to clear from the line at a fast rate.
The line clearing phase happens after most of the water has been purged from the lines but may still remain in low parts of the plumbing. Your ability to generate a high air flow rate through the purged lines is the critical factor in successfully blowing this remaining water from these locations. Choose an air source that delivers at least 100 cubic feet per minute (cfm) of air flow – most compressors only produce 2-5 cfm so you will need a blower. And again, use blow-out plugs that open wide at low back pressure to assure that the blower’s power can be realized as flow through the pipes. On return lines with more than one return branching off the main line, strong air flow to the farthest branch can be achieved by blocking the flow of cleared branches earlier in the run.
Once the lines have been cleared of water they must remain so over the course of the winter, so the plugs must effectively seal to prevent water from re-entering the plumbing from the pool. It’s still a good idea to pour antifreeze into the cleared lines just in case undiscovered cracked fittings, damaged threads, or badly installed plugs allow some water back in. After pouring antifreeze into the cleared line, turn the blower back on just long enough to see it blown into the pool through your blow-out plugs. The remaining anti-freeze will settle into low spots in the plumbing . . . just the spots that would be prone to problems if water got in.
Anderson’s Big Blue Blower and Winter Duck Plugs deliver the performance you need to assure each phase of the blow-out process is done effectively. The blower produces enough pressure “umph” to blow-out even the deepest main drain and provides an exceptional amount of air flow to clear all low spots in plumbing. Winter Duck Plugs open wide at low back pressures to clear lines quickly during the water purge phase and enable high air flow during the line clearing phase. Additionally, they can be easily blocked during this clearing phase with simple office binder clips to facilitate flow to all branches of the return system. Most importantly, over the past 10+ years, Winter Duck Plugs have proven themselves dependable at keeping water out of lines and protecting thousands of pools from winter freeze damage.
For a comparison of how Winter Duck Plugs compare to other blow-out plugs on the market see the results of our testing here.
Join Our Email List
Sign up to stay up to date on new products and techniques. We send occasional emails relevant to the swimming pool leak detection industry.