
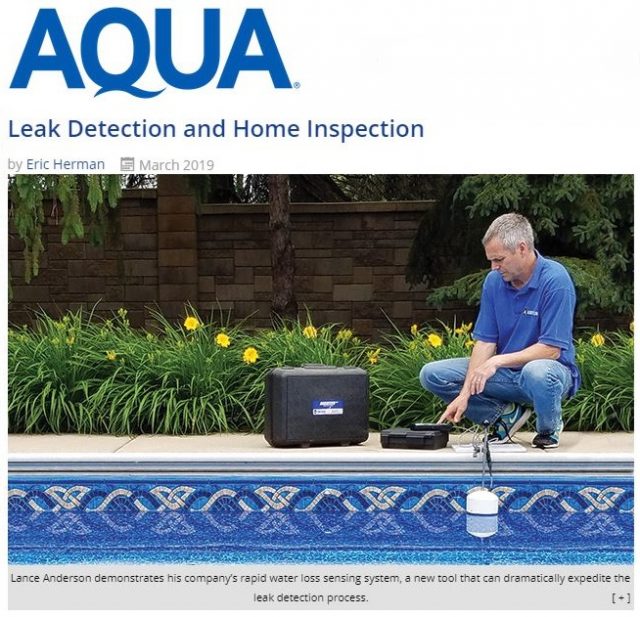
The Leakalyzer was recently featured in Aqua Magazine’s March 2019 issue! Check out Aqua’s interview with Lance Anderson and coverage of this helpful piece of equipment here.
Case Study: More than Meets the Eye
Type of Pool:
Vinyl liner
Equipment Used:
Leakalyzer, LeakTrac 2400, Dye
Situation:
The customer called us because they noticed the equipment pad was always wet, and the water level was dropping in the pool (estimated at ½” per day). They could not identify where the water was coming from, but thought the heater may be the problem.
Solution:
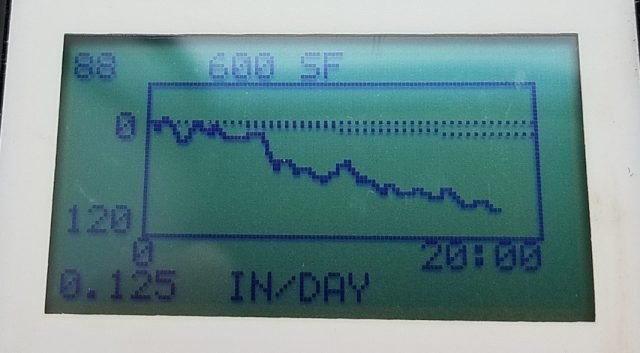
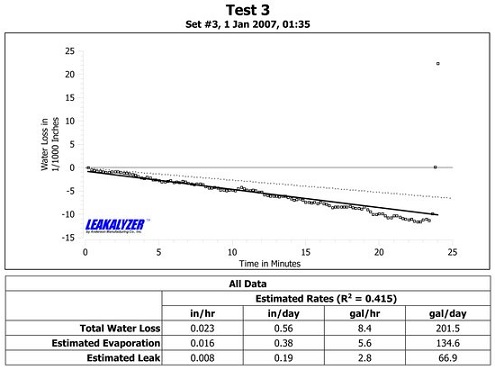
On arrival we ran a Leakalyzer test that showed .6” of water loss per day.
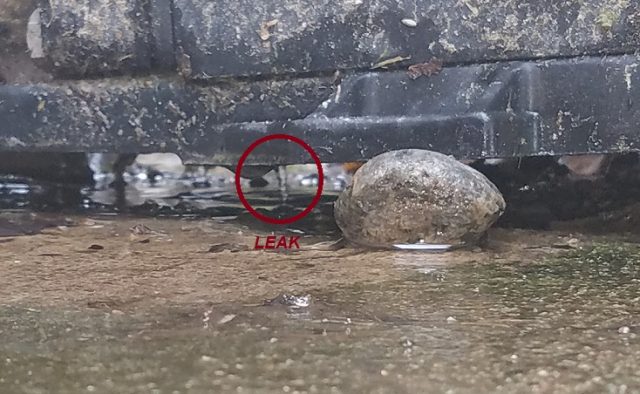
As the customer had reported, the equipment pad was very wet but we found that the heater was dry. We then lifted up the pump, which made a leak under the pump visible.
With the pump off, we then ran another Leakalyzer test that still showed .39” per day of loss, which meant that the equipment leak was only producing .21” of loss per day, so there must be an additional leak in the pool. We started examining the shell of the pool by dye testing a few areas where there had been previous repairs, but none of them drew dye. We than ran the LeakTrac 2400 which led us to two leaks in the same corner: one where a patch was leaking again, and a new hole in the liner about 6” away from the other leak. The LeakTrac 2400 could clearly differentiate between the two holes even though they were close together.
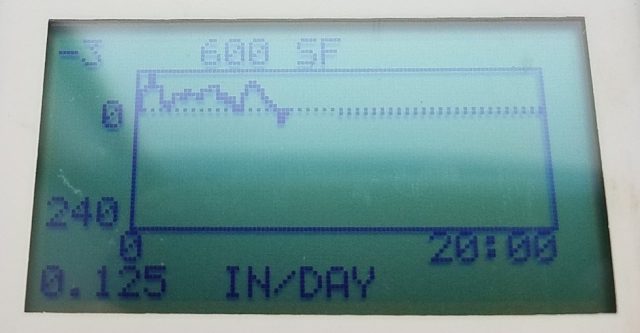
After patching the liner leaks we ran another Leakalyzer test with the pump off that showed no water loss, meaning the only leak left was the one in the pump. Not only did the Leakalyzer help us determine that there were multiple leaks in the pool, but it also confirmed that we had found all of the problems before leaving.
Learnings:
- Just because you find an obvious leak doesn’t mean you’ve found all of the problems at a pool – the Leakalyzer can help avoid that mistake!
- The LeakTrac 2400 can find multiple leaks in a pool, even if they’re close together.
Case Study: Multiple Leaks Don’t Have To Mean Multiple Trips
Type of Pool:
Vinyl In-ground
Equipment Used:
Situation:
Customer reported that the pool was losing water and had a light leak patched a year ago. It was a smaller pool with no deep end.
Solution:
Ran a Leakalyzer test upon arrival which showed a water loss of about ½” per day. Since we knew the light was a suspect area, we checked it right away with the Light Tester dome and it drew dye. After jumping in the pool and opening up the light we were able to pinpoint the leak between the light conduit and light niche with dye. At that point, the family showed up wanting to swim since it was a hot day. Since we had already found and fixed a leak we skipped the final Leakalyzer test… of course we got a call back one week later to let us know that the pool was still losing water.
What could have been a quick job turned into a second trip. The second time at the pool we were able to find a liner leak and a skimmer bowl leak with more thorough investigation. We made sure to run our final Leakalyzer test the second time around after fixing the leaks and didn’t get any further call backs. It’s a good reminder that just because you find one leak doesn’t mean you’ve found them all!
Learnings:
- Must be thorough in leak detection! Short cuts can lead to more time spent in the long run.
- The Leakalyzer is a crucial tool in multiple leak situations.
- When scheduling, make sure the customer understands they can’t swim in the pool during the leak detection!
Leakalyzer Tip: Use Pool Cover to Eliminate Evaporation
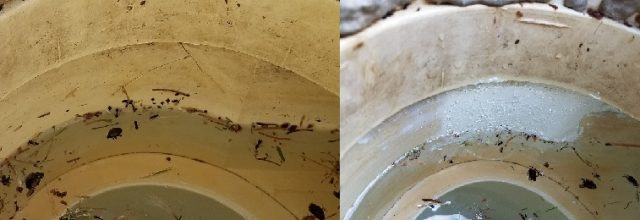
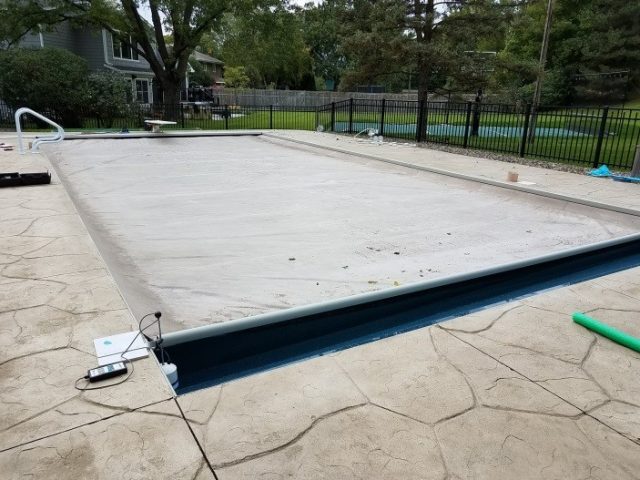
While evaporation rate for your area can be estimated using our Evaporation Index tool, you can eliminate evaporation all together by running a Leakalyzer test with the cover closed. This can be especially helpful in times when evaporation rates are really high in order to avoid confusing readings. If the cover rests on the pool water in any areas it will need to be completely dry, since the water evaporating off of the top of the cover could skew results.
Case Study: Thin Ground Probes are Necessary for Deep Leaks
Type of Pool:
Vinyl / In-ground
Equipment Used:
Leakalyzer, XLT30H Bigfoot and Ground Probes, Hydrophone, Pressure Testing Kit, Dye
Situation
We received a call about a pool that had just had a new liner installed, but was still losing lots of water. The customer suspected the water loss was in the main drain line. When we arrived to the pool the Leakalyzer confirmed the reported water loss.
Solution
The main drain lines were plumbed separately up to the equipment, so we put an open plug in each of the main drains to see if they would draw dye. One line did, but the other did not. To confirm, we pressure tested the line that drew dye with water and it failed. In order to pinpoint the exact location of the leak, we then induced air into the line and began to listen with the hydrophone for a leak under the pool, but didn’t hear any significant noises. We then switched to using the Bigfoot microphone with the XLT30H to listen through the concrete around the pool and still didn’t hear anything that indicated the leak location. Only when we started using the XLT30H ground probes in the soil between the pool deck and the equipment were we able to get close enough to the leak to pick up a great noise and find the exact location of the leak.
Learnings
- Thin ground probe rods included with the XLT30H make it possible to get the probe deep into ground to absorb leak sound vibrations.
- Turning air pressure off and back on once hearing the leak location confirms the noise is the one we are making.
Case Study: Listening Devices Pinpoint Even the Deepest Leaks
Equipment Used:
XLT30, Pressure Testing Kit , Leakalyzer
Situation:
The customer noticed that a lot of sand was being blown into the pool and that there were bubbles in the air filter, so a problematic skimmer line was isolated and shut off. However, even after closing and plugging that problematic skimmer line there were still sand and bubbles being blown back into the pool.
Solution:
When we arrived to the pool, the skimmer line was plugged and a Leakalyzer test with the pump off showed no water loss. That made us suspect that at least the portion of the plumbing below water level was good. We then pressure tested the other two skimmer lines to confirm the whole line was good and they held pressure. The main drain was eliminated as the source of a problem without getting in the water through our Leakalyzer test that covered the plumbing below the water line and an air lock test that included the line that was above water level. Eliminating all of these other areas left us to examine the problematic skimmer line as the only potential problem. Upon further inspection, the valve used to shut off the line wasn’t holding, which explains the continued bubbles and sand in the pool even after the line was taken out of use.
To determine the specific location of the leak within the faulty skimmer line, we induced air into water saturated soil to listen with the XLT30. At first the bubbling and gurgling sound of a leak was faint, but just by turning the volume up on the XLT30 we were able to identify a distinct noise where the leak was. It was fairly easy tonarrow the leak location down to a 6’ diameter, but in order to get down to within 2’ of the leak we needed to use the advanced filtering capabilities of the XLT30. Once the high filter was turned on, there was a clear spot with the most distinct noise. As sound waves travel they get more and more muffled, so the sound will be crispest and most distinct right over the leak. The sound did fade a little as time went on, but re-saturating the soil by inducing more water into the line revitalized the sound.
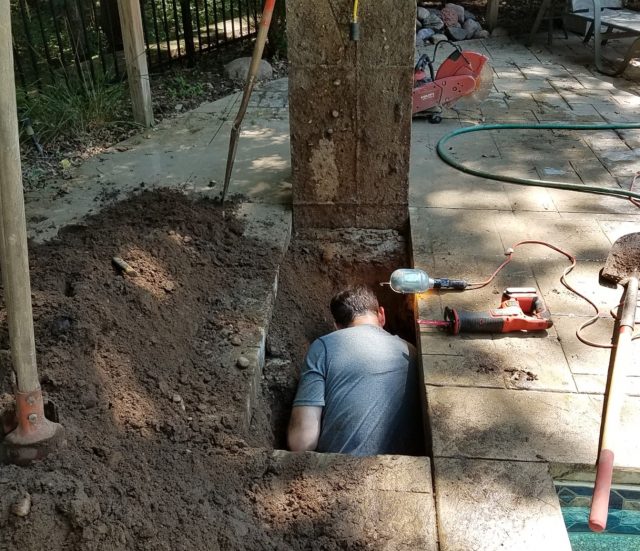
The customer estimated that the skimmer line was 18” to 2’ deep, but when we cut the concrete and dug down to that level there wasn’t any moisture or pipe. To confirm we were in the right place we turned the pressure back on and still heard the leak so kept digging and finally found the broken pipe at just over 4’ deep. Before we replaced the cracked fitting we cut the pipe and pressure tested both ways to assure the rest of the line was good.
Learnings (are there any key takeaways or learnings from how this leak was found?):
- Combining a Leakalyzer test with an air lock test of the main drain can confirm that line is solid without getting into the pool.
- If you notice a once strong leak noise fading, you may just need to add more water to re-saturate the soil.
- Trust your equipment! If you’re confident you heard a leak in a specific place, you may have to dig farther than expected to find it, but it will be there.
Leakalyzer Tip: Portable Shade Cover
Is the hot summer sun getting in the way of your successful Leakalyzer tests? Leakalyzers perform best when their temperature remains stable throughout the duration of the test. When exposed to the changes in radiant heat as the sun goes in and out of the clouds, the deck plate can expand and contract leading to confusing readings. We recommend setting up the Leakalyzer in a shady place whenever possible, but Mark Spatz of Florida Leak Patrol came up with a smart solution to carry shade with you wherever you go!
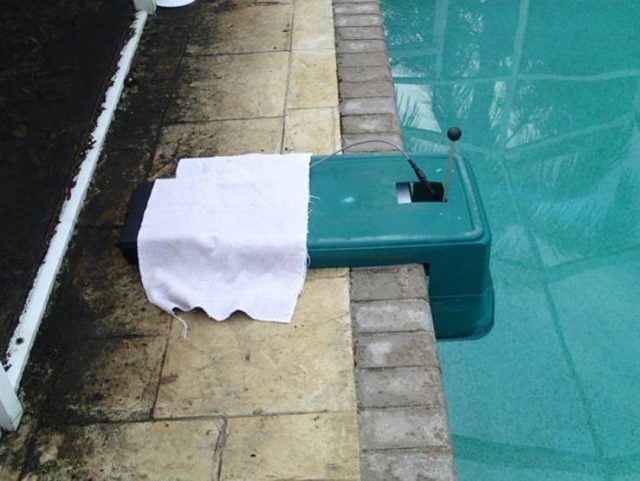
Mark fashioned his Leakalyzer “dog house” out of a large plastic tub that was cut to cover the deck plate and sensor capsule when set up at the pool. The sensor rod extends up through a hole in the top. A bucket can be placed over this rod to protect it from sunlight or the occasional unexpected stray shower. One edge of the tub extends into the water to provide additional protection from water turbulence when the pool system is running. Mark says he doesn’t use the cover everytime he pulls out his Leakalyzer, but that it does make his tests more accurate in certain situations.
Case Study: Air Escaping From a Leak is Loud
Type of Pool:
Vinyl Liner
Equipment Used:
Leakalyzer, LeakTrac 2400, Pressure Testing Equipment, Dye
Situation:
This job started as a request for us to run a vinyl liner scan with the LeakTrac because the customer had a leak that they suspected was in the liner in a swim ledge. So, when we arrived at the pool we did a scan of the liner, which showed the suspected swim ledge wasn’t actually a problem. The LeakTrac did locate a small leak on the vinyl stairs, but this leak didn’t draw enough dye to be the source of significant water loss. We quickly patched this leak with a Leakmaster Peel and Stick Patch before moving on to do a full leak detection.
Solution:
With a quick pressure test we found a skimmer line was not holding pressure. We then switched from inducing pressure with water to inducing pressure with air and heard a loud bubbling and gurgling sound right in the skimmer bowl without even using a listening device. The leak turned out to be a broken pipe just below the skimmer bowl.
To verify the rest of the line was good we dropped a 550 inflatable plug with an extension hose in past the leak and found the rest of the line held pressure.
A repair was scheduled for a later date, but before leaving the pool we plugged the skimmer line and ran a Leakalyzer test to confirm all leaks had been found.
Learnings:
- Pressure testing is a quick way to isolate a pipe leak
- Air escaping from leak in pipe makes a great noise for sonic location
- The LeakTrac not only can be used to find leaks, but also to eliminate the liner as the location of a leak if no leaks are found
Case Study: Leakalyzer Saves Callback
Type of Pool:
Vinyl / Indoor
Equipment Used:
LeakTrac 2400, Leakalyzer, Dye
Situation:
Customer told us that pool leaked down to 1” above the skimmer pretty quickly, then seemed to hold at that level.
Solution:
When we arrived at the job site we started our Leakalyzer test with the pump on which confirmed the water loss. After turning the pump off and marking the current test, we could see that the slope of the line continued to be the same as during the pump off test. Because of this we suspected a shell leak. Our observations of the pool equipment and plumbing system validated that the plumbing didn’t appear to be the problem.
Since a shell leak was suspected we began systematically dye testing the pool from the deck. By doing so we were able to find a crack in the skimmer bowl at the same level the customer indicated the pool water level held at. The size of the crack seemed consistent with what the customer and Leakalyzer indicated the water loss would be.
We then patched the skimmer with the Leakmaster Pool Glue Kit, which is adheres very well to the skimmer bowl and works underwater. After the patch we ran another Leakalyzer test to verify that the pool had stopped leaking. Although not as much as the first time, the test still showed water loss that was more than estimated evaporation.
With additional dye testing we quickly found another small leak in opposite skimmer. That leak was patched with Quick Set Putty.
We ran yet another Leakalyzer test and found the pool was losing less water than before, but still losing.
We finished checking fittings and gaskets with dye and then pulled out the LeakTrac. The LeakTrac was able to pinpoint one hole in the liner and eliminate the rest of the liner as a suspect area. Leakmaster Flexible Sealer and Leakmaster Peel and Stick Vinyl Pool Patches were used to patch the leak in the vinyl liner.
The water level was a little too turbulent after patching to get a great Leakalyzer test, but we spoke with the customer one week later and pool was not losing water.
Learnings:
- The Leakalyzer helped us make sure all the leaks were found before leaving the job, instead of just finding the first one
- Dye testing is really fast and effective
- Gathering good information from the customer shortened the leak detection process
Case Study: Fill Pool to Find Leaks
Type of Pool: Concrete, no spa, 400 sq. feet
Equipment Used: Dye, Leakalyzer
Situation:
No information was provided prior to arriving at the job site, but when we arrived the water level was down to bottom of the skimmers and the customer confirmed that the water leaked down to that point and then stopped. A Leakalyzer test confirmed the water level had settled and was not dropping any farther. We established some suspect areas then put a hose in to fill the pool back up while we headed to our next job. We came back later once the water level was back up to finish the leak detection.
Solution:
When we returned to the job site, we confirmed the pool was indeed leaking with the Leakalyzer, then started to dye test the suspected areas along where the water line had settled. Not all suspected areas drew dye when the water level was raised, but we did locate two leaks in the corners where grout was gone from the tile line. We repaired the leaking areas with Quick Set Putty, then confirmed that the leaking areas were no longer drawing dye and that the pool water level had stabilized with the Leakalyzer.
Learnings:
- It’s extremely helpful to know if the water level stops dropping at a certain point.
- Pool water level needs to be at normal operating level to efficiently locate leaks.
- Some leak detections are very straight forward!
- Job also led to a sale of upgrades in pool filter.
